This is part two of my attempts to get into actually playing AoS, and in a similar style to part one, It's going to be kind of half battle report and half discussion about what I'm learning. Once again I was playing against Dargiris and his chaos forces - this time taking the form of an army of mixed daemons led by Be'lakor himself! It was matched play, 2000 points, this time the scenario was 'The Vice' - an interesting mission where four objectives in the corners converge onto a single centre point in turn four.

To make it easier on myself I stuck with the same subfaction, Coatl's Claw, Coalesced. Slightly different unit selection though with the addition of the Bastiladon. Still led by the Oldblood on Carnosaur, Skink Oracle and Slann, with three units of Saurus cavalry, two of ten Saurus Guard and then a couple of units of Skinks. This felt like I had a decent melee punch backed up with some magic and shooting and some chaff units to grab objectives or get in the way. I've no idea if this is 'good' but it definitely feels more like an army that's purposely designed to do something than the last list.

Be'lakor's forces featured himself, a Lord of Change, big blobs of Horrors and Bloodletters, a couple of small units of Plaguebearers and some Flamers. Initially at least, I was informed that summoning was definitely on the cards for this force, as were models coming back to units in the battleshock phase.

Deployment - pretty straightforward I think, we both put our most powerful units in the middle facing each other, with our cheaper units in the corners to claim the objectives. My cavalry were also taking up flanking positions, with one unit backing up. This time I tried not to block my units in too much, giving them room to go forwards and either close enough together to support one another or far enough away that they would be harder to tag into awkward melees. I think I got it more or less right this time.

We rolled for priority, and I lost, so Dargiris gave me first turn. It was mostly spent marching forward after some buffs were flung around in the hero phase. The Slann did get a good deal of mortal wounds off with his Comet's Call spell, which was nice. I also remembered to use his ability to make one unit +1 save vs shooting, which would potentially be relevant in this game, and I swapped out his lore spell for a different one - which then failed to cast for the rest of the game. But it's the thought that counts!
I think, aside from a few bits like the Troglodon's regeneration, I didn't miss too many hero phase abilities in this game, which I'll take as a win!

Shooting was a thing that happened - the Bastiladon lasered the Lord of Change, but he grew all his wounds back shortly after.
The Chaos turn one was pretty similar - they moved up, tried to cast some spells (the Slann was on pretty good form for denying spells) then did a bit of shooting. The Lord of Change got some good rolls and halved the Carnosaur, while the Horrors chipped a bit off the Troglodon. They did summon a unit of Daemonettes though to support the Bloodletters. We both scored points for holding our two objectives, and also got two points for our battle tactics - we both took one that awarded points for three units running and ending up close to one another.
Going into turn two, priority was won once again by Chaos, and first turn given once again to the Seraphon. I'm not sure if the double turn would have gone better for them or not - with the objectives closing in towards the centre it might have opened up an opportunity for me to sneak in behind?
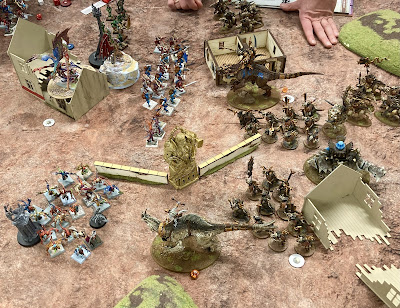

Anyway, the lizards moved up across the lines, ready for some charges. Before that though some spells and abilities happened - and I learned that the Slann not only makes a unit +1 save vs missiles, but also lets them fly, so my Guard jumped out of the building they were in. I decided the forward melee troops had to go, targetting the Daemonettes with some effective firepower to all but eliminate them and then charging the Bloodletter blob with the Oldblood, Saurus Guard and Saurus Cavalry. Turns out, that does the trick. Coatl's Claw Saurus Cavalry put out a lot of damage on the charge!


On the flank the Trog and Cavalry charged into the Horrors. Between them they killed 21 of the 20 Horrors, leaving the unit 40 strong after splitting. I'm not sure if this was a mistake or not, the Horrors were never likely to be removed, but I did hold them back from swarming the centre. Perhaps it would have been better to just throw the Cavalry in and leave the Troglodon to stomp around elsewhere?


For the Chaos forces, it was time for Be'lakor to get involved. He charged in to kill off the Oldblood (fulfilling his battle tactic), while the Plaguebearers piled in to bog down my Cavalry. On the flank they combined with the Horrors to bring down the Troglodon (just - if I'd remembered to regenerate him he might have lived...)
I'm not sure if I kind of fell into the trap here, or if this was a good trade for me. No doubt the Bloodletters would have been a problem if I hadn't killed them, and because I'd charged forward my units were mostly on the Chaos side of the board - which netted me points again for the battle tactic - once again we were even on points at 9 a piece.

Turn three, this time Chaos first, and Be'lakor cut through a bunch of my Saurus Guard while the Plaguebearers and Horrors gummed up the works once more. Be'lakor was tempted to fly off to one of my objectives, but the handy Skinks were in position to control it anyway, so he stayed to fight. In my turn I decided I need to go big or go home, and gambled on killing the first prince. The Bastiladon rolled pretty hot, but Be'lakor was able to save or pass off most of the damage to the Plaguebearers. The Cavalry charge was hampered by a few Saurus Guard still living and being unable to fall back and get outside of 3 inches of everything, and as a result the big(ish) daemon lived. With a failed battle tactic that put me a couple of points behind, but in turn four the objectives disappeared to be replaced by one central one, pretty much slap bang on top of the Bastiladon.
We didn't really have time to play the last couple of turns, with me slightly behind but standing on the objective it was going to come down to the battle tactics to decide it, and we had no real way of knowing how that would go, so we called it a draw. After the last game I'll definitely take that!
I had a lot more fun this time and it definitely felt more like a game. With all the results possible at the end it felt like decision making was going to matter, rather than just throwing models and dice at each other. I don't think I got too many things wrong in terms of rules, but I'm not entirely sure what to take away from the game tactically. Should I have tried to hold back the Troglodon or the Cavalry rather than charge the Horrors? Perhaps on the charge the Cav could have taken out a unit of Plaguebearers? I don't know. It felt like there were two or three immovable blobs that I was able to keep away from the centre but in doing so perhaps I wasn't able to throw enough resources at Be'lakor when it came to it.
I'm still not really sure or worried about if what I'm taking is 'good' - my collection is fairly small anyway so I can't vary it up too much, but I think most of it performed pretty well. The Oracle on Troglodon was maybe the only thing that was a disappointment - didn't really do much damage in melee and failed a spell when it mattered, but possibly that was just me misplaying it. It does look really cool too!
So I think we can safely say I am learning this game - it was still slow progress but it is starting to come together. As an aside I really enjoyed this mission, it feels like it's designed to produce close games which is always appreciated. Hopefully there will be chance for a part three soon enough, and hopefully you'll check that one out as well. Thanks for reading, and stay safe out there.
No comments:
Post a Comment
Due to spam messages I’m trying to use the comment moderation system. Hopefully this works!