Sunday 28 March 2021

Forge World Custodes Completed!

Hello!

In between painting Tyranids and Death Guard, I've been working away at an Adeptus Custodes commission project - a bunch of Forge World units painted to a comparatively higher standard than my usual. This was a bit of a challenge between Forgeworld instructions, painting three different schemes and resisting my urges to cover everything in dirt and battle damage! The background behind these guys is that they come from a variety of different Shield Hosts, making a combined force of individual warriors, rather than a neat regimented army like other Imperial forces.


First up, Aquilon Terminators, painted in the 'standard' gold with red - I'm not sure if they represent a specific host, but I thought I'd get my eye in with the 'default' scheme.


Two sets of them, with the weapons mixed over so three with bolters and claws, and three with the fists and fire pikes. I tend to prefer a warmer, redder gold so that's what they got, I think complementing their red bits and the fiery lava bases. Highlights over the gold was a mix of dry brushing and edge highlighting over the larger plates like the pauldrons. I wouldn't have that luxury with the others though...


Contemptor-Achillus of the Shadowkeepers Shield Host. A bit of a challenge to build and pose - I originally intended for a two handed thrusting pose but it was hard enough getting one hand to clutch the spear so we've got a striding one handed lunge type move. Lots of posing options on these kits but the size of a dreadnought does limit the dynamism of it. Regardless, I'm happy with the paint job, particularly all the gold which, on black, was easy enough to correct mistakes...


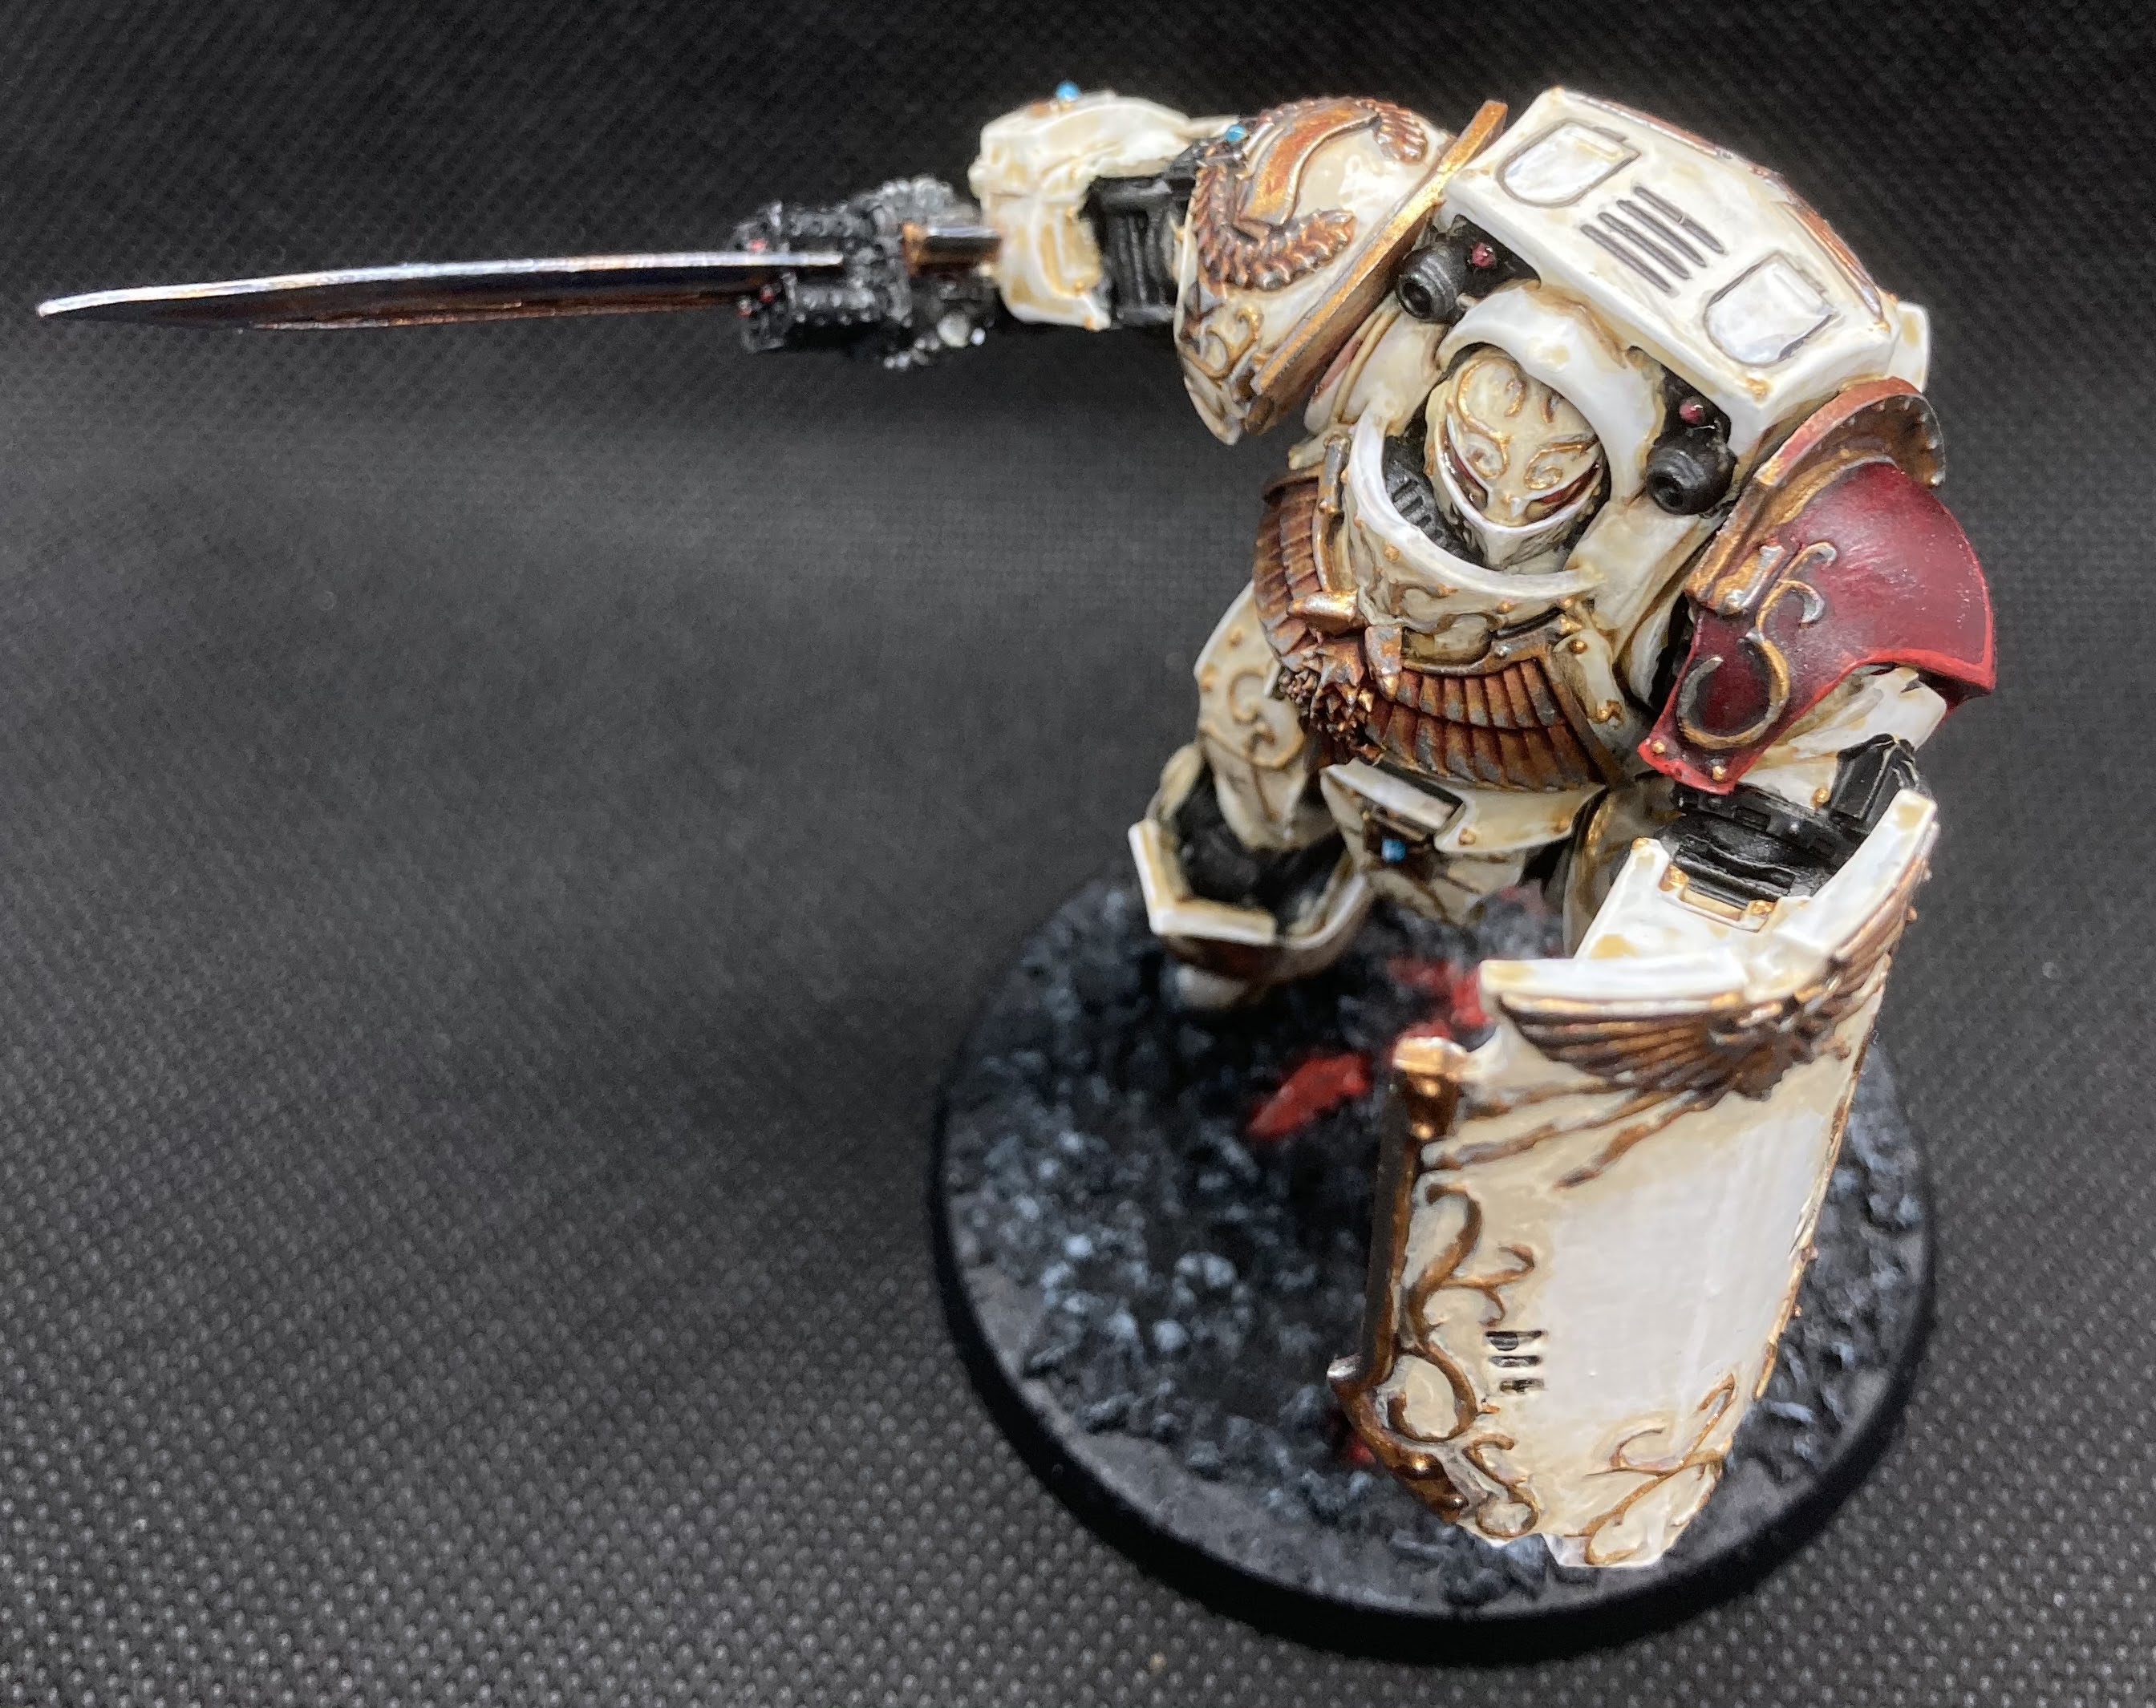
Final member of the team is this Contemptor-Galatus of the Solar Watch. I really like this model and the scheme for it, the white and gold really makes them stand out, but damn, it was frustrating to paint! I ended up doing several passes of washing the gold, then touching up around it with bone/white, then repainting some gold, then washing it again, etc. The end result is a bit messier than I'd like, but I'm still happy with the overall effect of being off-white rather than full on bone like the Deathwing or clean white like the Tau box art.

So with that, here's the whole crew together:


Ta da! I hope you like them, I'm pleased with the result and I think the client is happy. I've been comparing these to some of my other work of recent years pre-lockdown, notably my Legio Mortis Titans, which have a similar scheme to the black Contemptor, and though I haven't really gone out of my way to improve my painting, I definitely have!

Thanks for looking, and stay safe out there.

Tuesday 23 March 2021

Death Guard - Hobbypocalypse Month Two

Hello!

You may remember I started a Death Guard army for both New Year, New Army, and the DZTV Hobbypocalypse - going 250-ish points a month. I'm not sure if it's going to be an army I use or just a fun painting project, but in any case it's been a good excuse to have fun with the sponge - as described in my WIP post for these guys.

So, here's the completed set for month two - another unit of Plague Marines and a couple of characters, the Malignant Plaguecaster and Noxious Blightbringer (and his nurgling!):


I'm still really pleased with the overall effect of these guys, nice contrasting colours along with a strong theme - dry and rusty rather than wet and gloopy. I'm particularly pleased with the result of them all together...


That's month two done, and here's the card from Stylus:


Hope you enjoyed this look at my progress. Next time I think I'll be building some artillery. Thanks for reading, stay safe!

Thursday 18 March 2021

Kraken Tyranids Wave One - Done!

Hello!

As mentioned last time (in kind of a step by step tutorial), I've been painting up some Kraken Tyranids, mostly with Contrast paints. I've now completed the first wave of them, which works out to a patrol detachment coming to just under 1000 points. It notably features the Swarmlord (aka Kevin if you are a Winters SEO fan) who got an extra bit of love as you will see below. Anyway, here's the whole lot:


Here they are. 'Kevin', eight Genestealers, twelve Termagants, twelve Hormagaunts, ten Gargoyles, three Hive Guard and two Screamer-Killers...


As mentioned above, the Swarmlord got some extra care, being the big boss bug and all. I followed the same scheme initially, then added on another layer of highlights on top, tidying up the skin and giving extra definition to those carapace markings. I also had some fun with the swords making them look like (I hope) weird, alien weapons. Since he was special, I went and put him in the light box...


So there we are, hope you like them! I'm certainly happy with the result. Next I'll have a bit of a pallet cleanser with some interesting Forgeworld units, before I start of wave two (or possibly more Death Guard). Thanks for looking, stay safe!

Saturday 13 March 2021

Contrast Kraken Tyranids WIP - My Painting Scheme

Hello!

The last post on this blog was my Death Guard painting scheme, so anyone could do it if they wanted, but mainly so I could repeat it! In a similar deal, here is my scheme for Hive Fleet Kraken I've been doing for a commission. It's mostly contrast paints, so should be easy enough to do, and I'm hoping I can use some of this contrast practice on my Tyranid force when I do some updates.


Here's some I did earlier. 

For this 'tutorial' I'm going with Hive Guard, as they are a mainstay of Tyranid armies these days and they are a decent size with lots of carapace to show the full effect.


First stage of the painting process, spray with a bone spray paint. I used Army Painter Skeleton Bone. You could use the Wraithbone contrast base, but as you'll see below there is an extra step before the contrast goes on so we don't need that 'perfect' finish.


Next, a heavy drybrush of white over the whole model. A bit messy, but it should be enough to add a little extra bit of 'texture' once the contrast is on.


Contrast Skeleton Horde, thinned 50/50 with Contrast Medium, on over all the skin. Doesn't matter if it's messy and goes up the carapace, the red will cover it easily. I tried to avoid too much pooling, but a little bit is fine and works with the Tyranid models, and with the medium in there it goes on more evenly, so you don't need to worry too much.


Next, the carapace. Flesh Tearers Red, straight from the pot, slopped over all the carapace. Key to this was using a fairly big, soft brush (like the cheap artists' brushes you can get in packs from any craft store) and painting in big, slow strokes up the carapace from the bottom, so it pools on the underside of the ridges. As you can see it doesn't dry perfectly smooth, but a little bit streaky, which would be bad on a big tank, but works perfectly for organic armour.


Next step was to fill in some details, and cover some mistakes. I used Black Templar for the claws and spikes, Magos Purple for the joints, pipes, tongues and other Tyranid weird bits, and Dark Angels Green for eyes (bad examples here!) and 'toxic' parts - in this case I used it on the inside of the gun 'barrel'. I used some regular bone paint to tidy up a few places, most notably around the hooves. With that the contrast stage us done, and they would probably be perfectly serviceable minis if you wanted to stop here. At this stage I also added a bit of Agrax Earthshade over the teeth to make them stand out and over some of the spiracles (holes) Tyranids have in the sides of their heads, base of their tails, and in this case on their guns.


This next step is the 'special sauce' if you will. Using a brighter red (Vallejo Game Colour Bloody Red in this case) I added a series of semi-random small lines or notches around the edge of the carapace, giving a sensation of texture. I made sure to cover the raised areas with this, including the inner edge of the carapace over their back, but otherwise just added them to break up the colour. I do a more involved version of this for my own 'Nids, which I intend to, one day, do a tutorial for.


Finally, time for the bases. I used a mix of Stirland Mud and Battlemire over the surface, with Vallejo Game Colour Charred Brown around the rim. Then just added some tufts and static grass to complete it. Done!

Hope you enjoyed and possibly picked up something interesting. There will definitely be more of these Kraken nids along soon. Thanks for reading, stay safe!