Friday 31 August 2018

Battle Report - Chaos Space Marines vs Chaos Space Marines

Hello!

Another Open War battle between the Alpha Legion and the Emperor's Children at 2000 points. (I promise I'll play something else again soon - just after DT4...)

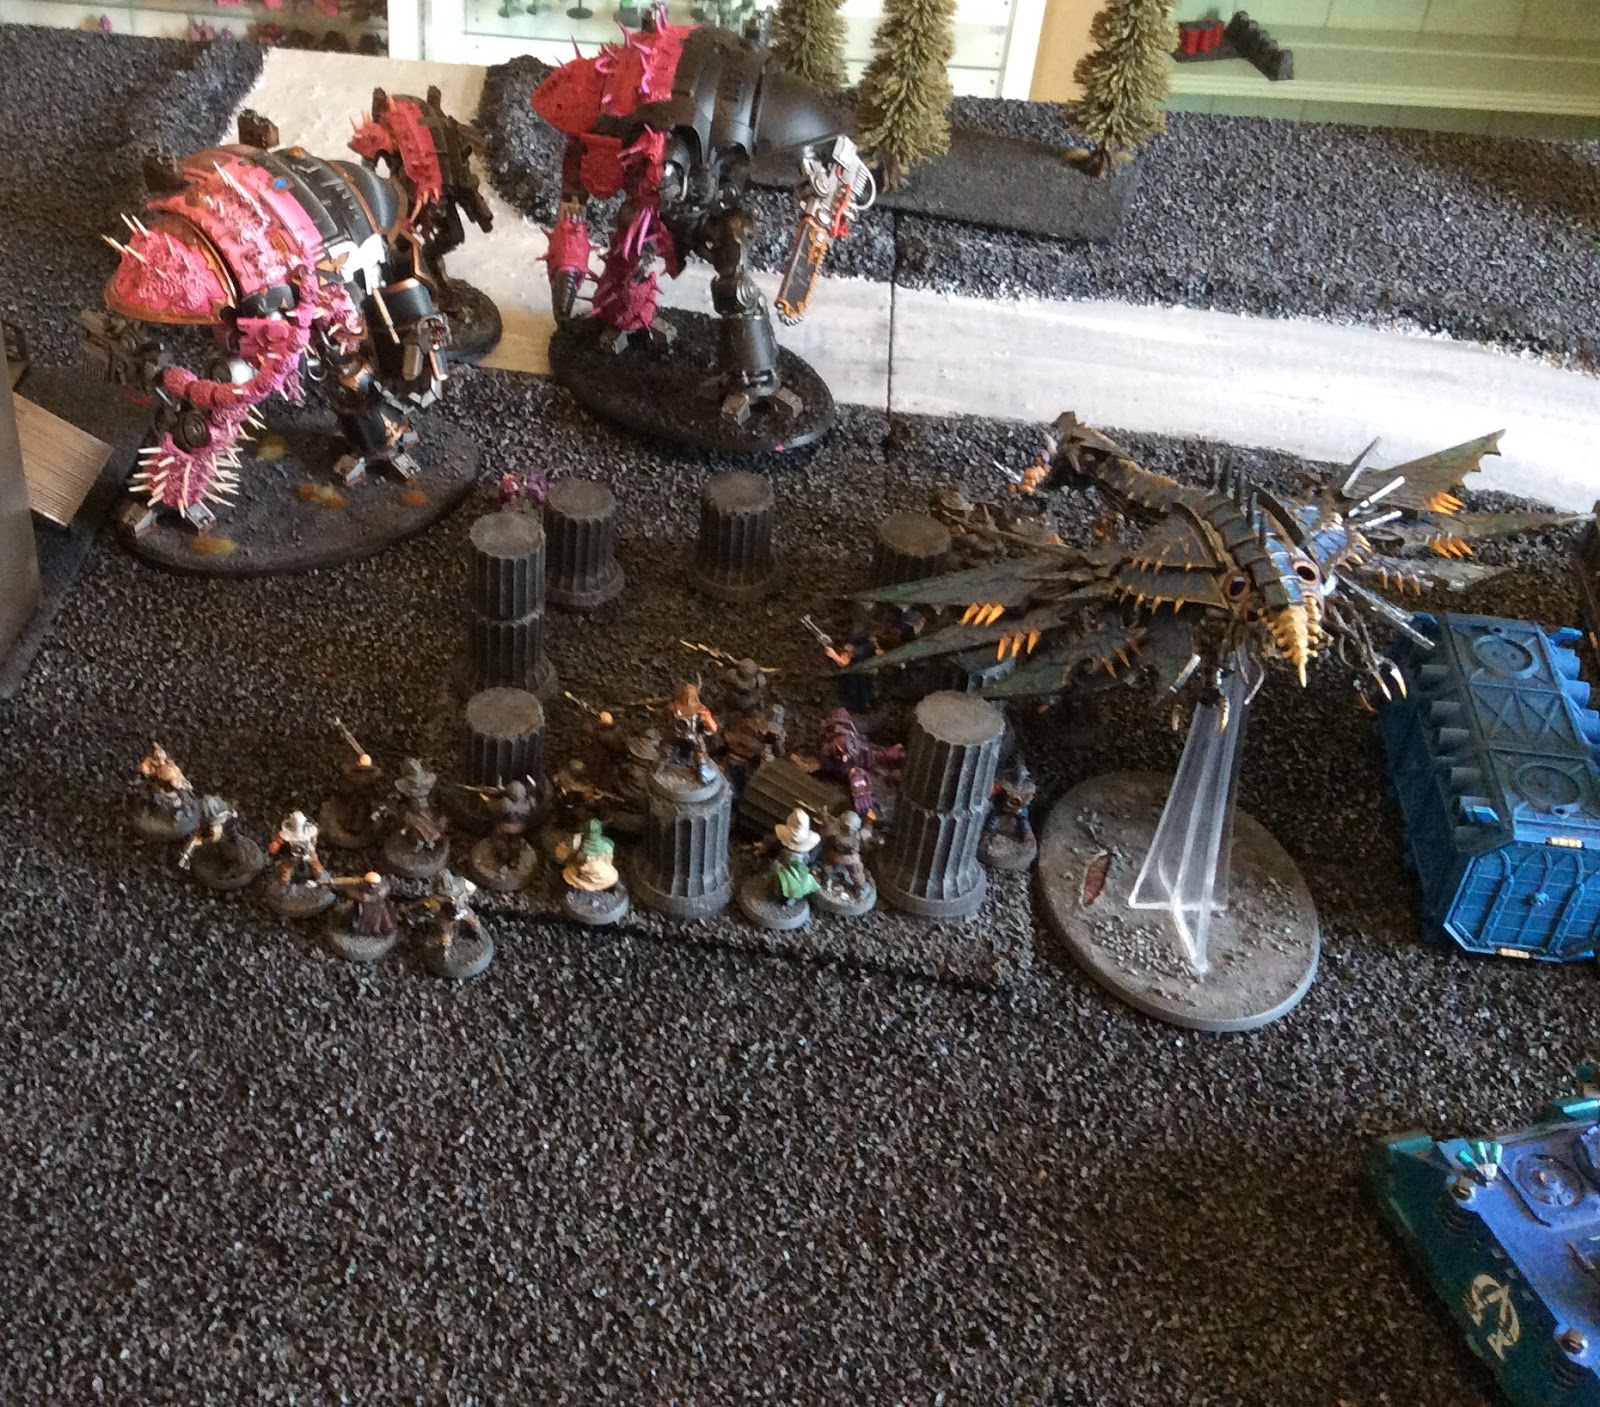
For this one we drew a mission that rewarded points equal to the power level of destroyed units, but there were double points on offer for vehicles, monsters and characters. I think it was called Gloryseekers or something. Our twist was Acid Rain - in the first turn of the game everything would be at -1 to hit and -1 movement, after then we would roll off at the start of the turn to see if the rain went away or came back - though after turn two we completely forgot to roll for it. Regular-opponent John got the ruse, Revenge! - If I killed his warlord the rest of his army would get +1 to wound on everything. The deployment was... hard to describe. It's show below. John set up on the edge and I got the 'shaft' deployment zone.


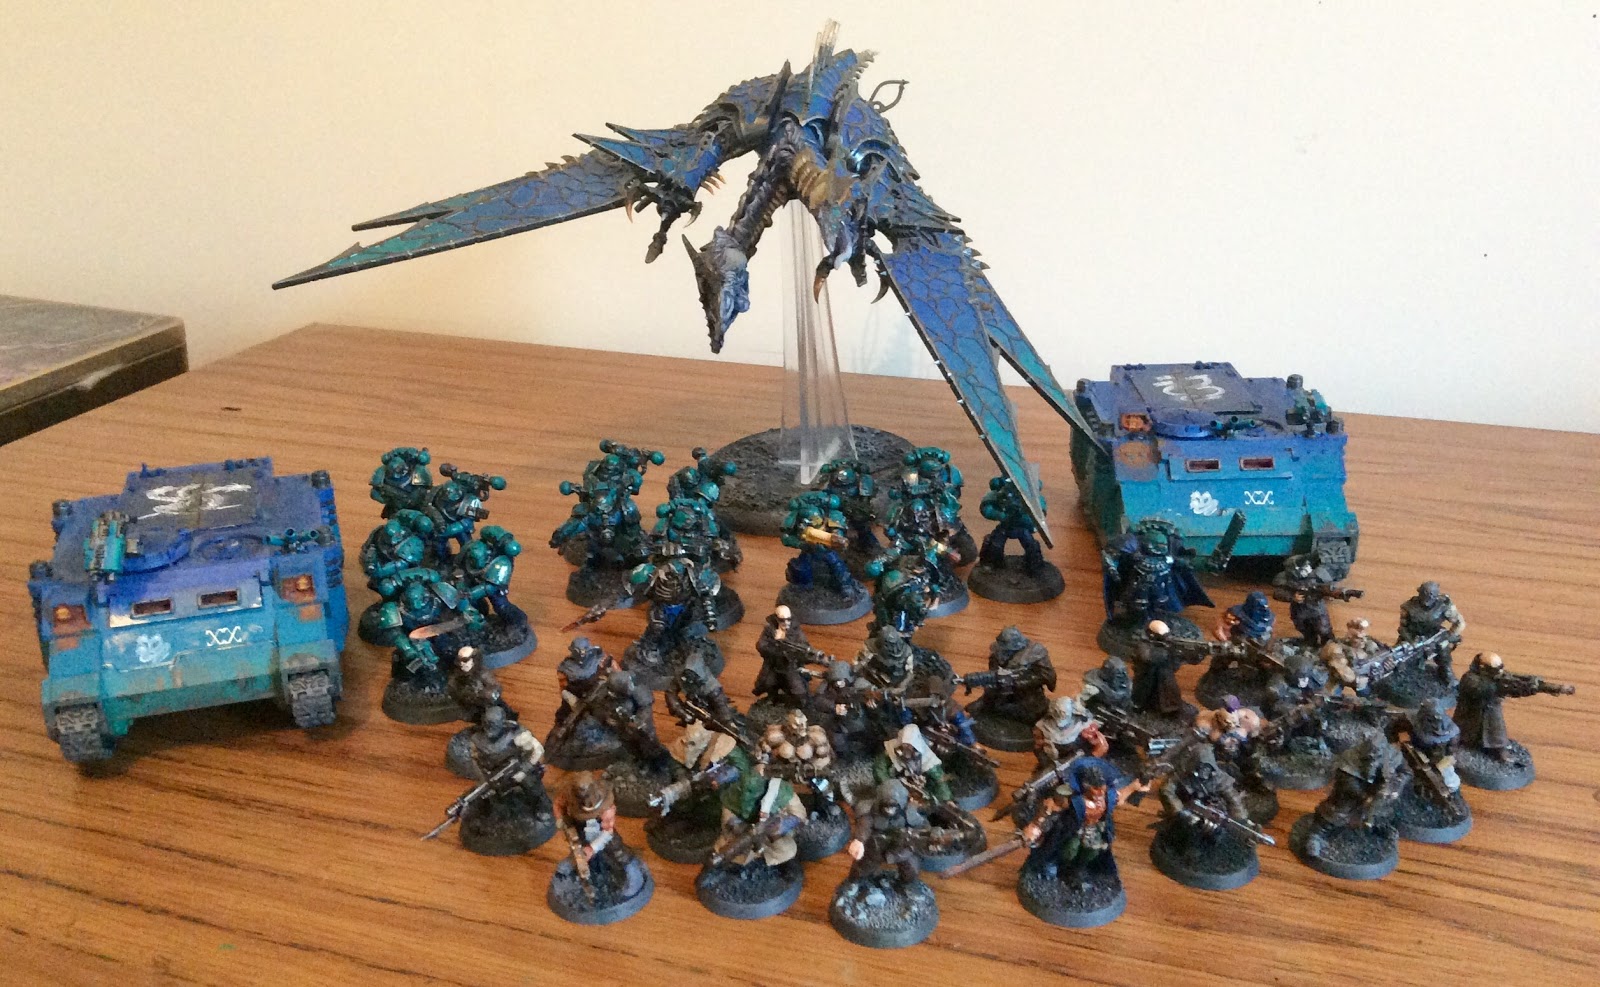
My list consisted of a Battalion and a Spearhead. For convenience everything was marked with Slaanesh.
HQ: Chaos Lord with Powerfist, Warlord Trait: I am Alpharius. Chaos Lord with the Blade of the Hydra. Sorcerer in Terminator Armour with Death Hex and Prescience.
Troops: 30 Cultists with autoguns. 5 Marines with a melta. 5 Marines with a melta. 5 Marines with a plasma and combi-plasma.
Elites: 6 Terminators, 5 combi plasmas, reaper autocannon, chainfist, lightning claw, 4 power axes.
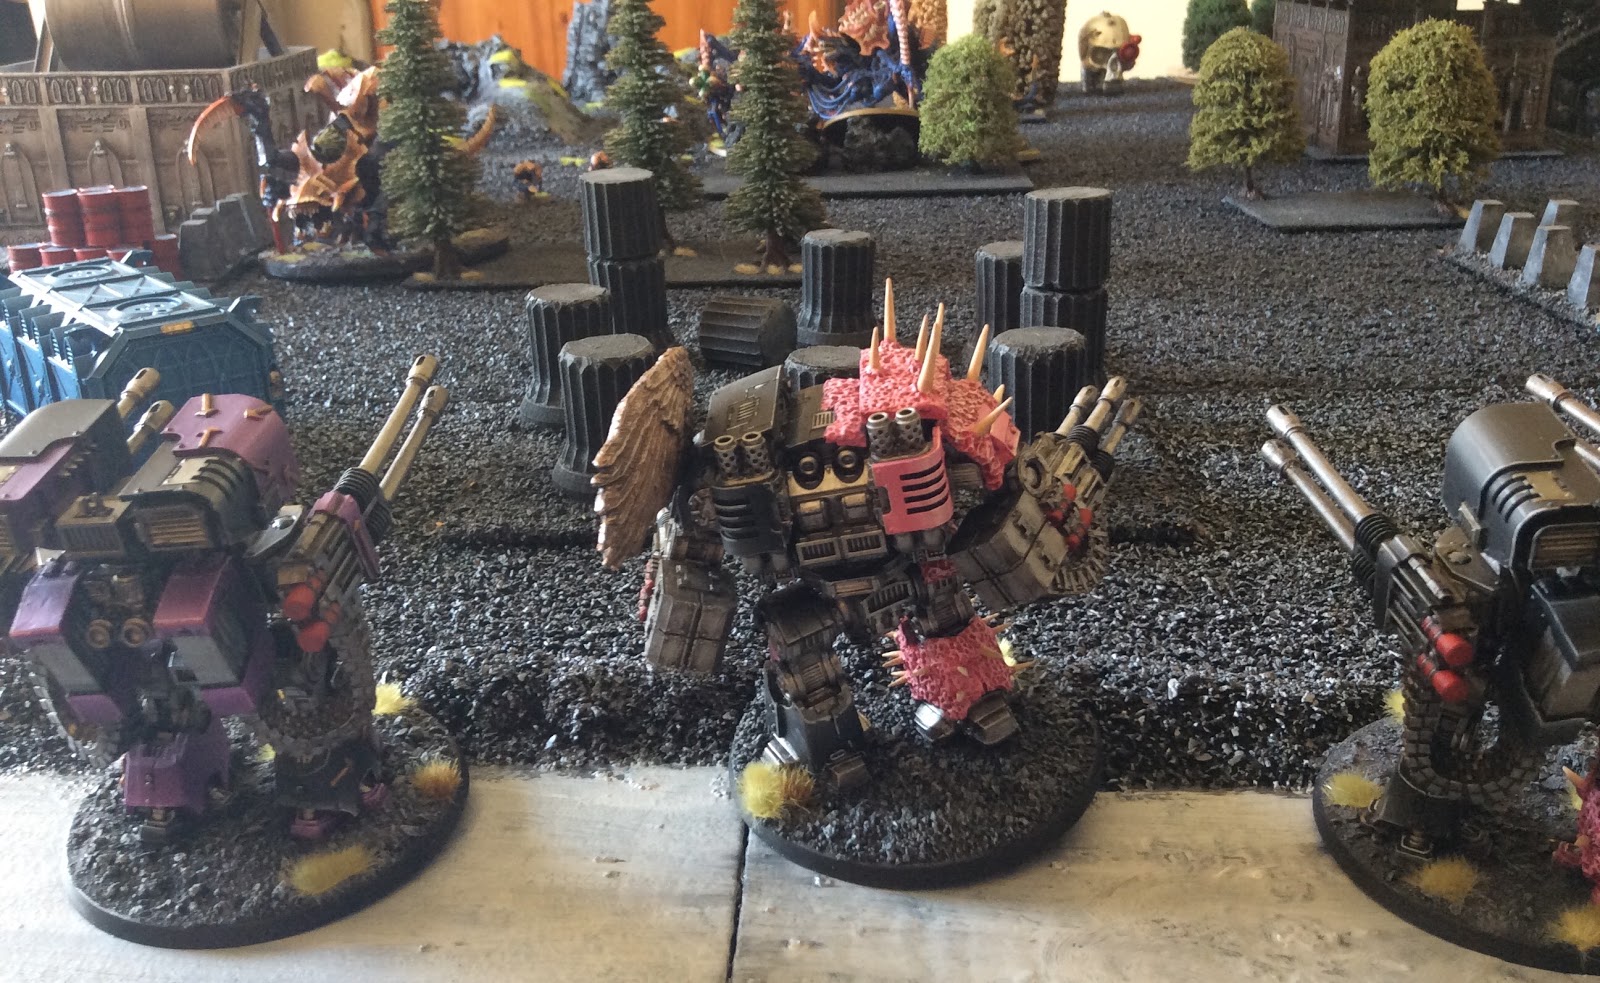
Heavy Support: Predator with all lascannons. Predator with lascannons and autocannon. 5 Havocs with 4 autocannons. 5 Havocs with 2 missile launchers and 2 heavy bolters.
Transports: Rhino. Rhino.
Flyers: Heldrake with baleflamer.

John also took a Battalion and a Spearhead, as well as a Super Heavy Auxiliary, obviously all Slaanesh.
HQ: Jump Pack Lord with lightning claws, Slaaneshi Elixir relic, Warlord Trait: Flames of Spite. Sorcerer with Death Hex and Prescience. Warpsmith.
Troops: 10 Cultists with autoguns. 10 Cultists with autoguns. 18 Noise Marines with sonic blasters and 2 blastmasters.
Heavy Support: 5 Havocs with 4 meltas. 5 Havocs with 4 plasmas. 5 Havocs with 4 plasmas.
Transports: Rhino. Rhino. Rhino.
Flyers: Dreadclaw.
Lord of War: Spartan


Set up for first turn. John won the dice roll and the Emperor's Children began the advance. Plasma Havocs (and a squad of cultists) were in the Rhinos, while the melta Havocs and the Warpsmith were in the Dreadclaw up in orbit. My Terminators and Sorcerer were waiting in the Teleportarium.


Rhinos moved up the flanks and fired their smoke launchers while the Spartan lined up shots on one of the Predators. The acid rain proved tricky and the 8 lascannon shots managed to only get one wound, though it did do 6 damage. 


In my turn one I moved up the Rhinos with the marines in and also launched smoke. The cultists attempted to advance to restrict a Rhino's movement but rolled poorly. The Drake zoomed up to be annoying and threaten something useful next turn. Fire from the Predators and the Havocs slammed into the Spartan - I realised that double that thing's power level is a very big number. Combined fire managed to drop it down to 10 wounds, into it's degraded profile.


The acid rain eased off, and from out of the clouds came the thundering drop pod, slamming into the hills behind my Predators. All the Havocs and Noise Marines got out of their transports and opened fire! The shooting phase was brutal, but for some very poor rolls, could have been much worse. Both Predators took multiple meltaguns and lascannons before eventually succumbing to the Blastmasters on the Noise Marines. My autocannon Havocs got vapourised by plasma, though the other team survived with only the loss of their champion. The cultists, as is tradition, all got sonic blaster'd to death. Finally John's tanks all made charges on my vehicles to reduce their movement options and, for the Heldrake, stop it charging. A devastating turn, but I was lucky not to lose at least the second Havoc squad or the Heldrake. It looked like all was lost for the Alpha Legion, but just as the mythical Hydra, cut off one head and two more shall take it's place... 


Reinforcements arrive! The Terminators and the Sorcerer dropped in behind enemy lines, looking to strike a killing blow.


John had screened his back lines well, meaning the Terminators were not in rapid fire range of anything worth targeting. All the marines piled out and picked their targets. John's two plasma Havoc squads got attacked by the plasma marines and the Heldrake, while meltaguns went into the Spartan. One hit and wounded (thanks to a command point) and took 6 damage off the beast. The lord then followed up with a Daemon shell, taking off another two wounds. With two remaining, the Terminators split their fire, killing a few of the Noise Marines while finally destroying the Spartan.


Knowing the damage he can do (but forgetting the ruse card) I charged my powerfist lord into his opposing number. Thanks to some good invulnerable saves, both survived. I also charged two chaos marine squads into the Noise Marines, losing most of a unit to overwatch, but eventually holding them up.


With most of his hard hitting units dead or in combat, John set about trying to get his remaining assets in position. The melta Havocs got back into the Dreadclaw and zoomed over to my remaining Havocs. The Sorcerer charged into my fist Lord, planning to finish him off (he was on 1 wound) and hide from the Heldrake. Meanwhile a pair of Rhinos charged the Terminators to keep them busy. The Sorcerer struck, but I passed my save, and spent the command points to interrupt and punch him in the face. The Lord died shortly after, but hey, guess what? He wasn't the real Alpharius!

In my turn the Havocs/remaining marines got lucky and kill off the Dreadclaw in one volley, allowing the Heldrake to incinerate some of the occupants. My new warlord charged in and finished them off. The Terminators polished off one of the Rhinos while one of my Rhinos charged into the Noise Marines to tie them up, surviving the overwatch and melee attacks on 1 wound.


John took his next turn and killed the 1 wound Rhino, but not much else. With the Noise Marines in the sights of the Terminators my Sorcerer smote the Rhino with warp energy, destroying it and freeing the Tactical Dreadnought equipped veterans to target the Noise Marines. With that, John conceded, and the Emperor's Children retreated. Slaanesh (and the dice) were not in their favour.

All things considered, a good game. The Terminators were appropriately scary, and the Heldrake killed lots of stuff for once. The missile launchers definitely pull their weight as well. I definitely got lucky, but perhaps that was just the favour of the Dark Gods?

Sunday 26 August 2018

Mini Battle Reports - Chaos Space Marines vs Chaos Space Marines, Renegade Knights

Hello!

In some kind of preparation for Double Trouble 4, John and I played a couple of little 875 point games. I took the Alpha Legion list I'm taking to DT4, while John used two of the options he was considering. In case you don't fancy clicking a link, my list is 2 Chaos Lords, 30 Cultists, 3 5 man Chaos Marine squads with assorted special weapons, 2 Rhinos and a Heldrake. This list is designed primarily around taking units I like/look cool, and secondly around mobility and the ability to take objectives. It's designed to be the 'support' half of a list that has a good chance of being paired up with Imperial Knights.

In the first game, John took a list he decided against taking. It's an Emperor's Children Battalion:
HQ: Jump Pack Lord with Lightning Claws, the Slaaneshi Elixir relic thing, Flames of Spite warlord trait. Warpsmith with combi-melta
Troops: 10 Cultists, 2x 9-ish Noise Marines, one unit with 2 Blastmasters
Transports: Rhino, Dreadclaw drop pod.

We played an Open War mission that basically boiled down to 'kill stuff'.


During deployment John hid his Noise Marines in transports (Dreadclaw off the board), while the cultists hid behind a building. I deployed my Marines in the Rhinos along with the Heldrake on the line of the deployment zone. Even though John was going first I spent two command points to pop the Cultists and the Powerfist Lord down, pretty much in the middle of the board. They were the bait to lure the Noise Marines out of their boxes.


The plan 'worked' in that the the Noise Marines all turned up/got out and killed all the cultists. Sadly John was smart and split the Blastmaster off to fire at the Heldrake, dropping him down to only a few wounds. The Noise Marines from the Rhino and the Lord charged my Lord out in the open (and the Cultist champion who probably wishes he died to the sonic weapons) and killed him easily. 


Now that blob of Noise Marines was out in the open, the trap was sprung! The Marines all got out of the Rhinos, along with the second Lord (now the Warlord - I am Alpharius!) and levelled their guns at the Emperor's Children. The Drake regenerated a wound, putting it on the middle profile. The first plan was to go for the second Noise Marine squad with both it's shooting and melee, but thanks to the damage it had already taken it couldn't fly that fast. It's Baleflamer went into them but did nothing. The Marines shooting all but killed the Noise Marines for minimal losses from their return fire (the Heldrake was reduced to 1 wound...) I really wanted to tie up or kill that Lord, so had to charge a squad of Marines into him. One survived to keep him busy while putting 2 wounds on the Lord. This turn kind of worked, but I had to sacrifice a good chunk of my army and really needed to either kill the Lord or do some more damage to the second Noise Marine squad.


In John's turn there was some movement, then the Heldrake died to the Warpsmith's curse. Other shooting reduced one of my 5 man squads to just the champion with a combi-plasma. With only the Rhino in range to charge, we had some stunt driving...


6s to hit, a wound and then a failed save! The Champion falls to a Rhino to the face!

Elsewhere the Lord made very short work of the power sword Champion.


My turn, the remaining Marine squad jumped out of combat and back into their Rhino. (We had a look and couldn't see anything in the rules that forbids this - let us know if this isn't allowed for some reason.) My remaining Lord revved his relic weapon - the Blade of the Hydra, and headed over to face his opposite number. I didn't have much on the board, but John didn't have much anti-tank (his blastmasters were in the unit that died). I figured if the Lord could kill John's Lord and the Rhinos could do some damage to the cultists with their combi-bolters I might still be in the game.

Sadly, the Rhinos killed approximately 1 cultist. They then charged the Noise Marines and the Cultists to tie them up and took minimal damage. The Lord charged, hitting and wounding enough to force about 5 saves. John passed all of them.


With that it became a mopping up job. My Lord fell, and the Slaaneshi Lord charged in to kill off one of the Rhinos. The Warpsmith and Dreadclaw put damage on the other. I pretty much conceded at this point, via getting my last guys out and shooting/charging the Noise marines.

A solid win for John, but I think it was a fair showing for my force. It wasn't really a mission to their liking, but, for a little luck, they were holding their own in a fight.

The next game was definitely not in my favour. John's actual list for Double Trouble 4 is a Renegade Knight super heavy detachment.
Lords of War: Renegade Knight, sword and fist, heavy stubber, Leadership reducing bubble relic, Warlord trait: Tenacious Survivor. Renegade Knight, sword and fist, heavy stubber. Renegade Armiger, Melta Lance, Chaincleaver and heavy stubber.

Technically this game had 3 objectives, but they were largely irrelevant. I decided early on I wasn't going to play the 'castle up at the back and rush objectives on  turn 5' game that I might just win, but that would be really boring. Instead I resolved to see how much damage I could do. I also picked up a Ruse from the Open War deck - Revenge. If my warlord(s) died, I would get +1 to all wound rolls for everything.


Again I used two command points to pop the Cultists right up front along with a Lord. The Knights moved a bit, then it was my turn. The Heldrake moved up to support and the Rhinos shuffled in behind. Unwisely, I spent 3 command points to use Veterans of the Long War and then Endless Cacophony on the cultists, just to see how much damage it would do to a Knight. Turns out, not very much - they took about 5 wounds off it.


In response the Knights went stomp stomp stomp! Many, many cultists died, and on of them managed to tear the Drake out of the skies with it's Reaper chainsword. I spent two command points to keep the few remaining cultists around and disengaged them to surround the Armiger - hoping to hold it up long enough to give me chance to kill one of the Knights. I also charged my Lords into the Knights, aiming to do a few wounds before they sacrificed themselves to buff my army (which they successfully did).


The Renegade Knight response - move forward, kill stuff. The Warlord Knight and Armiger finished off the cultists, after shooting damage reduced one of the Rhinos to a single wound. The other Knight charged the fully intact Rhino, crushed it with his fist, picked it up, and threw it at the other one, which promptly exploded. Between emergency disembarking and explosions I was down to 9 marines. Those marines decided to try and make a name for themselves, moving in to fire at the most wounded Knight, then eventually charge it. They reduced it down to about 3 wounds, but eventually (predictably) all fell.

A very strong win for the Renegade Knights. John's force is looking good for potentially winning the Genocidal Maniac award at DT4 for killing the most stuff. I'm still fairly happy with my guys however. They may not have performed in these games but I'm expecting they are most likely to play alongside a more killy force, like John's, where I think they will shine in more of a support role. That's the plan anyway. Let the allies do the killing and be killed, while the Alpha Legion are free to pursue their own agenda...


Tuesday 21 August 2018

Battle Report - Tyranids vs Chaos Space Marines

Hello!

Open War deck battle report number two. Tyranids against Chaos again, this time no Knights, but plenty of dreads. The cards decided we would play the Supply Cache objective, where there are 6 markers, at the start of a player's turn roll a dice for each, on a 6 that is the true objective, discard the others. The deployment was two arrow shaped zones on the short edges that meet in the middle of the board - deployment limits units to being 3 inches from enemies, so we could be very, very close for this one. The twist was Eager of the Fight - essentially increasing all move, advance and charge distances. This time John had the lower power level so he got a ruse - all his units that did not move would count as being in cover.

My list was a pair of battalions, both Jormungandr.
HQ: Malanthrope, Hive Tyrant with wings and 4 brainleech devourers, 2x Neurothrope
Troops: 3x3 Ripper Swarms, 30 Termagants, 2x3 Warriors with deathspitters and a venom cannon
Fast Attack: 3 Raveners
Heavy Support: 2x Tyrannofex with Rupture cannon, Mawloc
Lord of War: Scythed Hierodule

John took Emperor's Children, I think it was a battalion, a Vanguard and a Superheavy Auxiliary
HQ: Chaos Lord, Chaos Sorcerer on steed, Chaos Lord on steed
Troops: 2x10 Cultists, 18 Noise Marines
Elites: 3x Noise Marine Dreadnought with Blastmasters and power scourges
Heavy Support: 2x Decimators with Storm Lasers
Lord of War: Spartan


I set up pretty aggressively, with some Rippers and Termagants trailing back to hold the objectives. The Raveners, Hive Tyrant, some Rippers and both the Neurothropes were off the board, using two command points to put the 'thropes in tunnels underground. John had a token unit of cultists up front, standing on an objective, while the rest of his force stayed 'safe' further down the board.

I grabbed first turn, and of course I rolled a 6 on the first objective I rolled for, meaning the game was now a fight over a single objective at the back of my deployment zone, guarded by Ripper swarms hidden behind rocky hills.  


First order of business, the Termagants surrounded the cultists and made them super dead. More firepower from my force was largely ineffectual, but the Scythed Hierodule used the movement boost from the twist to speed up the board and charge all the Noise dreads. 


I was hoping to, using the attack twice stratagem, kill all three, but a bit of a whiff on the first round of attacks meant I only killed two and took a significant chunk of wounds from the fight back. Slightly disappointing, but I had given John something to think about, and would hopefully keep his force far away from the objective.


Noise Marines got out and moved up to clear out some chaff. Noise dread disengaged, allowing almost all of the Emperor's Children to open up on it. In the shooting phase the Hierodule took a battering, but kept standing. A few warriors fell, but the real damage was to come in the fight phase. The Noise Marines charged the Termagants, and I played the Caustic Blood stratagem to do mortal wounds on 6s when they die, which seemed worth it after the marines killed off 20 of them or so.


Elsewhere, the Lord charged the heavily wounded Hierodule, using Veterans of the Long War to wound easier. Using the Flames of Spite warlord trait, the big bug was killed off with mortal wounds (generated on a 5+ from veterans, after rerolling wounds from lightning claws - ouch.)


We now had a big line of Termagants and Noise Marines snaking down the middle of the board, and I was in danger of being pushed back completely into my own deployment zone. But not for long...


My turn 2 and the reserves arrived. Raveners dug up to bring both Neurothropes behind the Spartan, while the Tyrant dropped in next to them and the Mawloc popped up in a nice spot between the walking lord, the sorcerer, the Noise marines and the Spartan. Shooting was again fairly useless (apart from the Tyrant, who overkilled the remaining cultist squad, hiding in some cover on the far right corner), but the psychic powers put a lot of damage on the Spartan.

In melee, I opted to charge one of the Tyrannofexes into the Noise Marines to keep them tied up once they disposed of the Termagants. At this stage I didn't really want to kill them, as they would then be able to fire on several weakened or valuable units. The tactic worked, as marines aren't great at hurting toughness 8 monsters.


Elsewhere the Lord and Sorcerer decided to Heroically Intervene on the Mawloc, presumably to stop him slithering off and charging something more useful. He took a few wounds but in response targeted the Sorcerer, who he had already caused some mortal wounds to, and stuffed him into his big gob. Omnomnom!


John was feeling somewhat defeated at this point, but I reminded him about the speed boost twist and the massive movement potential of the Chaos Lord on steed of Slaanesh. The Lord covered approximately half the battlefield in one go, leaving several units behind to deal with my intrusion. The Tyrant fell to shooting, while the Raveners too serious damage. John charged the rest with almost everything, including the Spartan and the Lord on foot. Hilariously the one surviving Ravener managed to kill off the Lord, presumably emulating his big Mawloc brother.


The Lord on Steed fared better, charging forward, killing off a bunch of Termagants, Rippers and Warriors before eventually slaying one of the Tyrannofexes. This was a problem because the objective was currently only guarded by 3 Ripper swarms and the Lord could easily reach them in a turn of movement.


Over the next couple of turns I cleared most of John's back field, killing off the Spartan with psychic powers (first time I'd killed it - I may have prioritised this over securing the objective a bit too much) while the Tyrannofex continued to keep the Noise Marines occupied.


Eventually the Lord made his move, zipping away from melee with my remaining chaff units to get within striking distance of the objective. Note that John had last turn, so I wouldn't be able to respond to his last move. One of the Decimators also managed to move quickly down the board to become relevant. I had to make some desperate charges with Ripper Swarms and the Malanthrope to try and drag him down.


Finally the Lord fell to the hyper-toxic Malanthrope, after killing all the Rippers. John made a bit of a mistake by withdrawing from melee with the Noise Marines in order to get some overwatch, but this allowed me to shoot the Decimator on my last turn, finally getting a good round of fire from on of the gun beasts, reducing it to a single wound.


In John's last turn the Decimator moved up onto the objective and opened fire on the Malanthrope. Thanks to the -1 to hit the floaty gas bag survived. As the last move of the game John debated charging in to try and finish him off, but with no melee weapon and only 2 wounds left on the Decimator (it regenerated one), he decided there would be a good chance the Malanthrope would have killed him and won me the game. In the end the Decimator held back the charge in order to draw the game.

So, second game in a row the Malanthrope has been left holding the critical objective at the end. This time only for a draw, but I'll take it. I think we both made some rather foolish, sleep deprived tactical blunders, so this is probably a fair result. John's Lord is an absolute beast, but in the end he's still a squishy lump of biomass in a tin, and now he's being digested by the Malanthrope. I was pleased with my 'deep strike' Neurothrope tactic to get some tasty Smite targets. I've been playing around with some different alternative uses of the tunnelling stratagem, and I think this one seems like a winner. Neurothropes are such a pain to get rid of plus are very reliable Smiters. One of them had Psychic Scream as well, so I was getting a fairly reliable 3D3 mortal wounds out of them. On top of all that, the Mawloc did his job superbly, and easting the Sorcerer was just a hilarious extra bonus.

Another fun and surprisingly close game with the Open War deck. So far, so good, I suspect we will play a few more games in the near future.

Wednesday 15 August 2018

Double Trouble 4 Army List and Preview

Hello!

With Double Trouble 4 fast approaching, it's about time I decided on my list! I believe the deadline for both list submission and buying a ticket (hint hint) is Saturday the 18th at midnight, and I think I've just about come to a decision. Here is what I'm leaning towards:


The Fractured Truth - Alpha Legion Battalion - 875 points
(Everything marked Slaanesh for convenience)

Chaos Lord: power fist; bolt pistol; Warlord Trait: I Am Alpharius
Chaos Lord: Blade of the Hydra (chainsword); bolt pistol

29 Chaos Cultists: autoguns; + 1 Cultist Champion (shotgun)
4 Chaos Space Marines: bolters; meltagun; + 1 Aspiring Champion (bolt pistol; power sword)
4 Chaos Space Marines: bolters; meltagun; + 1 Aspiring Champion (bolt pistol; power axe)
4 Chaos Space Marines: bolters; plasma gun; + 1 Aspiring Champion (combi-plasma)

Chaos Rhino
Chaos Rhino

Heldrake: baleflamer


My thought process was as follows: Orks don't have a codex yet, I did Tyranids last time, I did Ad Mech the time before that, Knights will probably be everywhere. Haven't taken Chaos to an event for a while, so why not? My next thought was 'I've got a two headed Heldrake, that's kind of cool, I should take that. And I do like the Rhinos with the big transfers on them...'

So with that in mind I started putting the list together. I decided early on that I wasn't going to just focus on killing stuff like normal, and that I would actually try to take objectives and be useful this time. That meant troop choices, which meant a battalion and a nice number of command points. One of those choices would be a blob of cultists, for Forward Operative/Veterans of the Long War/Endless Cacophony/Tide of Traitors fun. After that I felt somewhat lacking in anti-tank so I grabbed a couple of meltaguns in marine squads, and a third squad with plasma/combi plasma to add some versatility. Two Lords filled the HQ slots for relatively cheap, able to provided the reroll 1s bubble in two separate locations. The Warlord will probably go up with the cultists to aid them and be aggressive - if he dies the other one will become the warlord anyway, and he will be hanging with the marines in their Rhinos. With the spare points I sprinkled some melee weapons on the champions, just in case.

I know this is not a very competitive list, but I think it should be fairly fun and has a reasonable amount of stuff in it for 875 points. Remember of course this will only be half an army, and I'm hoping my partners will be capable of doing the real damage while I cause problems with cunning and trickery - and if we lose, well, that's clearly what the Alpha Legion planned all along!

In other news, this time I will not be going alone, as Regular-Opponent-John will be coming along as well. I'm not entirely sure what he's bringing but I suspect I will involve at least 3 pink/purple robots and will be very killy. I would not be entirely surprised if he picked up the Genocidal Maniac award, as it is very much in line with his play style.


I also know Dave Weston of the Confessions of a 40k Addict blog is attending, and is planning on taking quite a scary large robot based list. I'm calling it here now, if John and Dave team up with their expected lists, someone is going to have a really bad day - hopefully not me!

Saturday 11 August 2018

Battle Report - Tyranids vs Chaos Marines and Renegade Knights

Hello!

Back to battle reports, back to Tyranids against John's Chaos. This one is a little bit different, as we used the Open War cards, which were completely new to me. (John had recently been to a tournament at Warhammer World that used them and presumably enjoyed it.) We played at 2000 points, and let the cards decide the mission. Turns out it was short edges for deployment, with a central objective that could be carried off like the Relic. The twist was that our forces were split into three, deploying up to half of the units, then the other portions coming in on turn 2 and 3. Adding up power level we found my list was slightly lower, so I got a ruse card - if my warlord were killed, the rest of my army would get a bonus (I think it was reroll wound rolls of 1). Also to note, the game would automatically end after turn 5.

This game was also the first time John's new table was unveiled. It's all pretty and textured and in 6 sections so you can move bits around. A bit of a pain for rolling dice on so we used a tray, but that does have the bonus of not seeing dice all over the board in the pictures.

Lists:

Tyranids, Hive Fleet Jormungandr, Battalion, Spearhead, Superheavy Auxiliary
HQ: Malanthrope (Warlord Trait: Insidious Threat), Hive Tyrant with claws and the Miasma Cannon, Hive Tyrant with wings, claws and brainleech devourers.
Troops: 20-ish Termagants, 10 Termagants, 10 Termagants
Elites: 3 Venomthropes
Heavy Support: Tyrannofex with acid spray x2, Trygon, Trygon Prime
Lord of War: Scythed Hierodule

Chaos, Emperor's Children Spearhead, Renegade Knights Superheavy Detachment
HQ: Chaos Lord, Sorcerer (Warlord trait and stuff)
Heavy Support: Deredeo Dreadnought with Butcher cannons and missiles x2, Leviathan Dreadnought with Butcher cannons
Lords of War: Renegade Knight Acheron, Renegade Knight 'Gallant', Renegade Armiger 'Warglaive'

I deployed my Tyrannofexes, the walking Tyrant and the bigger gant unit around the Malanthrope. I chose to have the Trygons come in next, along with the little gant units in the tunnels and the Venomthropes who I spent a command point to also put underground. Last would be the flyrant. John popped the three dreads in a deep firing line and the Acheron on the edge of the deployment zone. The characters and Armiger would come in next and the melee knight would turn up on turn 3. John managed to get first turn, and we were off.


The Acheron moved up, then everything opened fire. Thanks to the Malanthrope, the Jormungandr trait and high toughness, the targeted Tyrannofex survived on a couple of wounds remaining.


My turn, and I decided that Acheron must go! The Hierodule broke cover and moved towards it, while the Termagants strung out and the monsters shuffled where appropriate. Bioacid melted some wound off the Knight, but still left the Hierodule with work to do.


The Hierodule took the overwatch from the big flamer like a boss, and charged comfortably into melee. Popping Voracious Appetite, those big Scythes managed to bring the big knight down. This put my force considerably closer to the centre than John's dreads.


The Scythed Hierodule had done his job, but now he had to face a fearsome gunline...


Unsurprisingly, with buffs from the newly arrived characters and an assist from the Armiger, coming on from a flank (part of the rules of the twist in play), the Hierodule fell. However he had effectively forced John's force to keep back, and the central objective was now well within my reach. (It's the fallen marine amongst the trees.)


My turn 2, and the diggers arrive. Trygons pop up to form a barrier in front of the objective, screened by Termagants and protected by Venomthropes. On the other flank the Termagants strung out to ensure a Knight could not walk on there, while the Tyrant left the safety of the Malanthrope in order to do the same job behind the Trygons. My slow moving 'castle' moved up slowly, and there was a little bit of token shooting. Time to weather the storm...


John's turn three, and the butcher cannons lit up the Tyranids. The Knight was forced to move on from John's edge, the Armiger moved up but the dread line stayed back and received their buffs. The Venomthropes were first to go, all brought down by a single dread. Next the Prime dropped, while the Termagants around it were killed off with missiles. Some long range fire killed off the injured Tyrannofex for good measure. Finally the Armiger charged the Trygon and the last of it's remaining Termagant screen, killing off the monster before it could strike and leaving the Termagants to flee, now out of Synapse range. That was brutal, but I wasn't out of it just yet.


My turn 3, and the Flyrant arrived near the dread line. The Malanthrope finally reached the objective and the remaining Termagants ran in front to screen. Shooting and Psychic dropped the Armiger down to a single wound, but the infernal machine would not fall! In what might have been the play of the game, the Flying Tyrant got a 12 inch charge on a Deredeo and managed to pile in to tie up the Leviathan as well, John realising too late his error in positioning them so close.


John, now running out of time, focused his remaining firepower on removing the Termagants, reducing them to a single model (who survived with the use of a command reroll!) The Armiger managed to get a long enough charge to get into the Malanthrope by piling in to the gant at a weird angle, but failed to kill it. In return I sadly failed to kill the 1 wound Armiger with the Malanthrope.


Elsewhere the Knight charged the Tyrant, but somehow failed to kill it. I was all ready to lose the Tyrant here but it's 4+ invulnerable saves held out, with a bit of command point help. More importantly the Knight had to stay back rather than moving further up the board.


In my turn 4 I moved the Malanthrope back and tried to shield it with everything. The Flyrant managed to kill the Armiger in the psychic phase, while the one remaining Termagant moved directly in the Knight's path to hopefully force it to take a slightly longer path to the Malanthrope.


John's shooting phase was expectedly brutal. The two Tyrants and the gant were killed, leaving the Knight looking to charge the Tyrannofex and also hit the Malanthrope. We measured it up, and the Knight was just outside of 12 inches of the Malanthrope, and therefore unable to declare it a target of a charge. That one Termagant had just about forced it's movement to deviate enough to keep it at bay! The Knight got a big charge anyway, crushed the Tyrannofex with the fist and attempted to throw it at the Malanthrope, but it wasn't enough damage to kill the warlord.


And with that, my last model remaining floated out of combat with the Knight, carrying the objective with it (apparently you can do this in the Open War version of the Relic). Victory for the Tyranids, just about!

In the end this was a fun game, a bit of a shooting gallery for John but in the end playing to the mission paid off. In hindsight John thought he should have put both his Knights on in turn 1, which I think I agree with, it would have been very tricky to stop him rampaging all over the objective had he done so. The Open War cards were a bit random, but also quite fun, though my ruse went unused - I considered throwing the warlord in to get killed, but in the end I needed an untargetable character too much. I think we will give them another go soon.