Saturday 29 September 2018

Video Battle Report with SorcererDave - Tyranids and Genestealer Cult vs Astra Militarum

Hello!

Seems like SorcererDave works fast, our battle report is up on YouTube already!


I don't have much to say on this, I'm actually watching it myself right now! Managed to get it on the telly, and the intro looks pretty epic on a slightly bigger screen. As an added bonus I don't sound nearly as Westcountry as I had expected. If you are interested in more pictures of my army and some thoughts on what I brought, check here.

Hope you enjoy it nearly as much as we did!

Wednesday 26 September 2018

What kind of Sorcery is this?

Hello!

After having a fabulous time playing a game with Hive Fleet Goliath against Winters SEO for one of his awesome Battle Reports, I’m ready for more! I really had a great day playing a friendly, narrative focused game with an eye on making sure it looked cool for the internet. I can’t really say until the video goes up, but I think we did a good job of that.

Anyway, I’ve arranged to play another game with a YouTube battle reporter, this time with SorcererDave. SorcererDave runs a pretty big channel but most of his content is video game based, however he has recently branched out into filming 40K battles with a narrative focus. He’s not quite built up the wide network of opponents yet that Winters has, so I kindly offered to ‘help out’. Because playing cool narrative missions of 40k on beautiful terrain with a strongly themed army is such a chore.

Anyway, we are going to be playing a 1750 point narrative game with his Imperial Guard/Astra Militarium against a combination of my Tyranids and Genestealer Cult. The army will look something like this:


The list is heavily themed around the first wave of a Tyranid invasion, with lots of units dropping from the skies or from ambush, and with the core of the Genestealer Cult force acting as the Guard ‘reinforcements’. The Warlord Hive Tyrant and the Tyranid units are in a Jormungandr Outrider detachment, while the Genestealer Cult forms a Battalion. The adaptation doesn't really do anything for this list, but it's narrative so I feel the need to stick with the one that is the 'official' adaptation for Hive Fleet Goliath. I'm also considering using a stratagem to throw down some spore mines at the start of the game, as that would be very thematic for the first stage of an invasion, so they are in the pictures but not the list itself. (It's narrative so I won't have to save reinforcement points for them.)


Hive Tyrant with Wings: 2 devourers with brainleech worms; Monstrous rending claws; Adrenal glands, The Horror, Psychic Scream, Adaptive Biology, Infrasonic Roar

20 Termagants: 20× fleshborers


10 Gargoyles
10 Gargoyles
10 Gargoyles

Trygon: prehensile pincer tail; adrenal glands

Hive Crone

Patriarch: Might from Beyond
Magus: Mass Hypnosis 

5 Acolyte Hybrids: Demolition charge
10 Neophyte Hybrids: 2× Grenade launcher; 8× autoguns ; Neophyte Leader


18 Purestrain Genestealers: 18× Purestrain talons

1 Cult Leman Russ: Heavy bolter; battle cannon

Cult Chimera: Heavy stubber; heavy bolter; multilaser


Hopefully it all goes well and something that looks cool will come out of it. There is a little scrap of a plan that if it is successful we might turn it into a multi part narrative campaign, but we shall see...

Sunday 23 September 2018

Imperial Knight Valiant, House Taranis, WIP

Hello!

"I've seen that Redtoof has been playing some games, but what is on his hobby table?" Is the question on literally no one's lips. But I will answer it anyway! It's a Knight Valiant! (And has been for the past month...)


Once I'd gawped at the kit a bit, I started to put it together. I'd been warned it was a bit tricky, and while there were many components I was quite impressed with the clever design of the sprues - 2 identical ones make up the main body, arms and legs, (the legs are the same components, just assembled differently) and a unique sprue for the guns and the carapace.


Construction took me a couple of days. I had to use elastic bands to hold the torso in position a few times to ensure it would all fit together neatly, but nothing too traumatic. I also couldn't quite bring myself to build it completely stock, so gave him/her some battle damage around the face, which would be fun to paint.


There isn't much in the way of options in the kit so I didn't feel the need to magnetise all the weapons. I did put one on the connection between the legs and torso however, for ease of transport and the ability to turn and face your foes on the battlefield! After this it was time for the base, a mix of slate, sand and some larger chunks of rock or resin. Then the undercoat, and ready to start!


First round of boring bits. I heavily dry brushed pretty much the whole thing, before painting on the main colours. There were many layers of white. Many, many layers.


A little further down the line and the main colours are almost done. There is some shading on the red here and the trim has been painted metal. Nothing too exciting.


Boom, a big change to the next step. Red painted to a nice bright-ish shade, then Nuln Oil wash over all the recessed areas and everywhere that'd going to be weathered. This step really made the Knight pop and it also signaled the start of the fun bit.


And here are all the bits as they are now. A couple of extra detailing bits done and we are now ready for the transfers. After that it's the base, the weathering and the glowy bits! With any luck the end result will be up on the blog in about a week, so keep and eye out for that!

Thursday 20 September 2018

Battle Report - Adeptus Mechanicus and Imperial Knights vs Chaos Space Marines and Renegade Knights

Hello!

It's another Open War battle report. This time the Adeptus Mechanicus of Forge World Ryza and the Knights of House Taranis stand against the forces of Chaos - the Emperor's Children and their Renegade Knight allies. The mission was Invasion - there are two objectives, one in each deployment zone. If you control both of them at the end of your opponent's turn, you win. The deployment was short edges, but with deployment allowed right up to the middle line. The twist was Set Piece Battle - one side deploys everything first, then the other. The side that deployed first goes first on a 2+. We played at 2000 points, but due to power level being used to determine who got the Ruse card, it went to the forces of Chaos, since I had to pay for a number of modes that weren't in my list. Luckily it was something largely irrelevant and went unused.

My forces were a Ryza Battalion and a Taranis Super Heavy Detachment.

HQ: Tech Preist Dominus (warlord trait: Monitor Malevolus, relic: Weapon XCIX), Tech Priest Enginseer
Troops: 10 Vanguard, 10 Rangers (with arc rifles), 6 Kataphron Destroyers (with Plasma Culverins)
Elites: 7 Sicarian Ruststalkers
Heavy Support: 3 Kastelan Robots (7 Heavy phosphor blasters and 1 set of fists)
Lords of War: Knight Errant (with meltagun and Icarus autocannon), Armiger Warglaive (with meltagun), Armiger Warglaive (with meltagun)

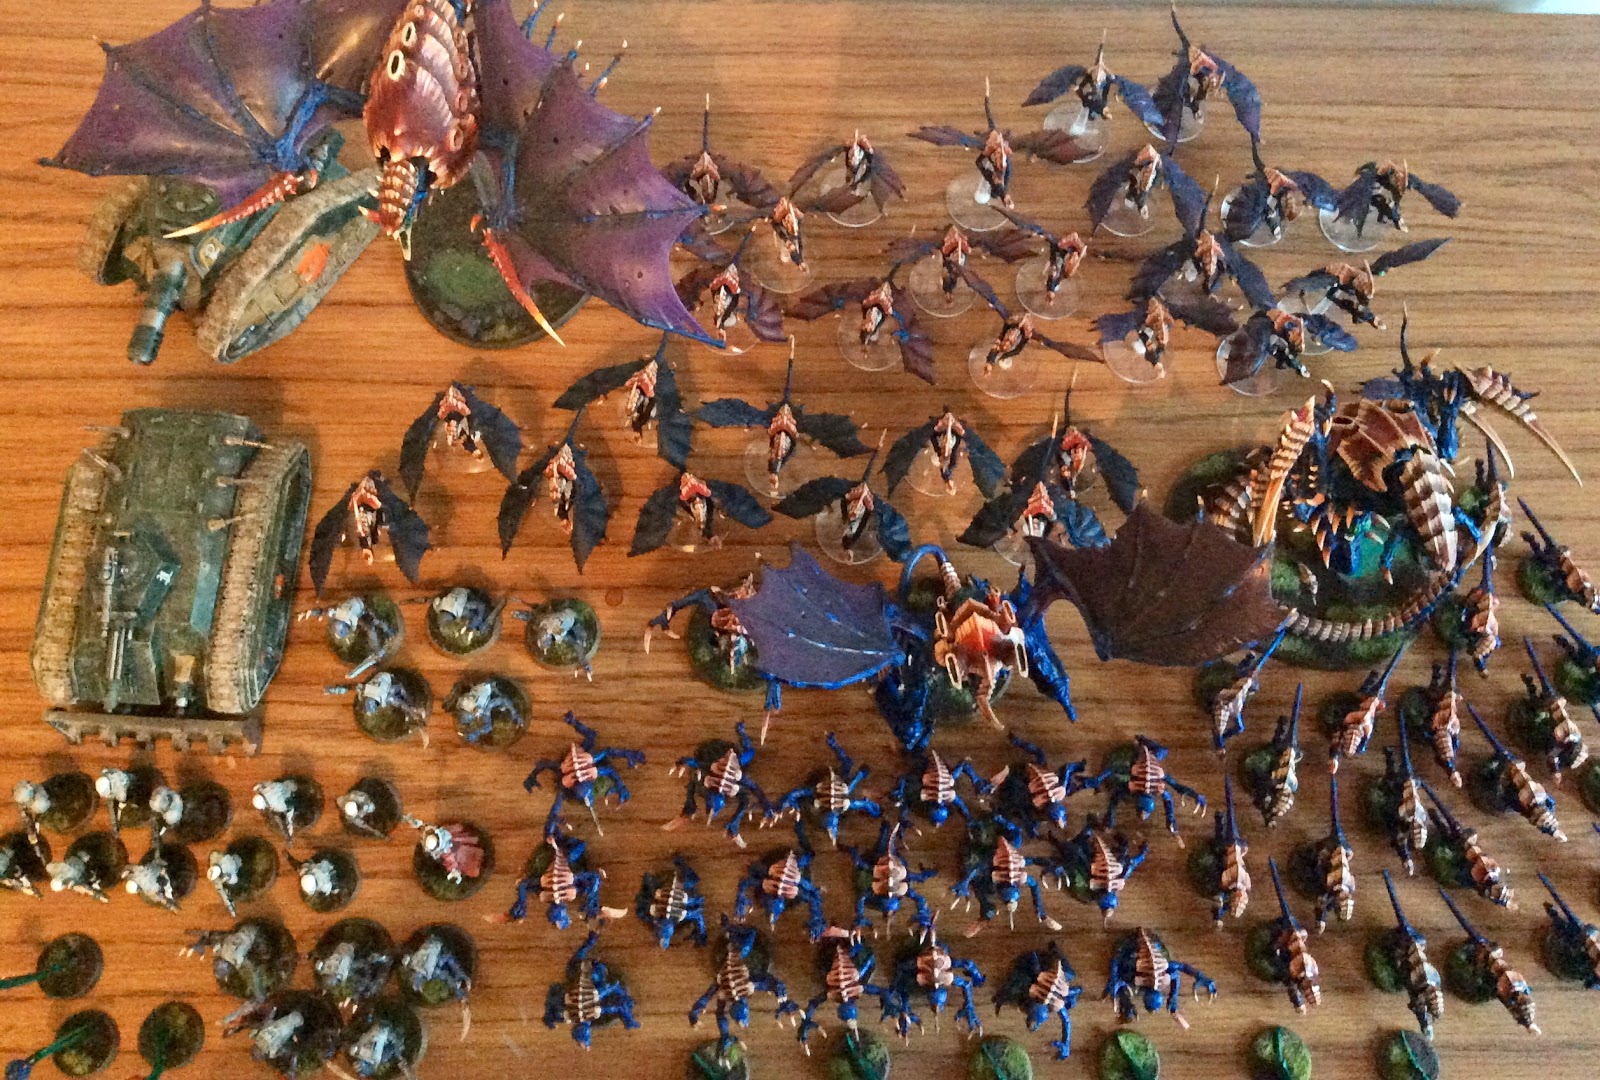
Regular opponent John took a chaos force that I can only assume has just stepped off a daemonic forge world dedicated to Slaanesh. It featured an Emperor's Children Spearhead and a Renegade Knights Super Heavy detachment.

HQ: Daemon Prince
Troops: 16 Cultists (I think)
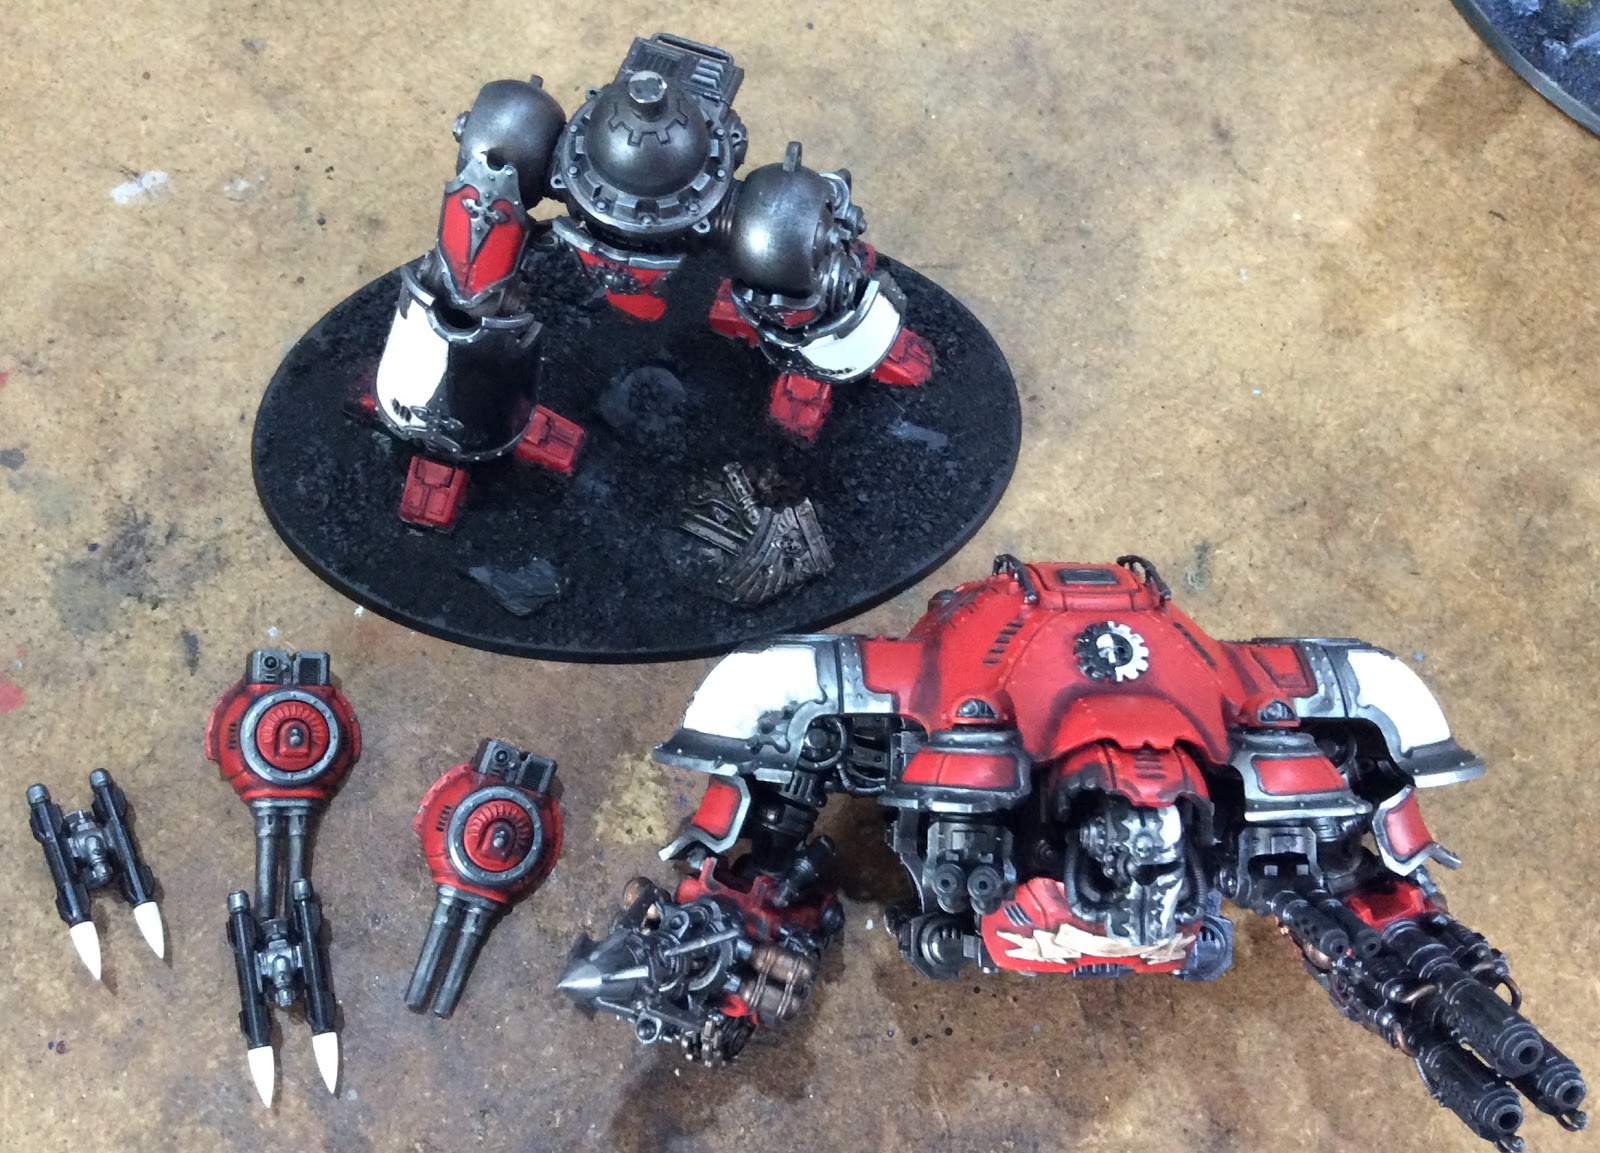
Heavy Support: Decimator (2 Soul Burners), Decimator (Soul Burner and Storm Laser), Decimator (Soul Burner and Storm Laser)
Lords of War: Renegade Knight (Reaper chainsword, Thunderstrike gauntlet, heavy stubber), Renegade Knight (Reaper chainsword, Thunderstrike gauntlet, heavy stubber), Renegade Knight Acheron

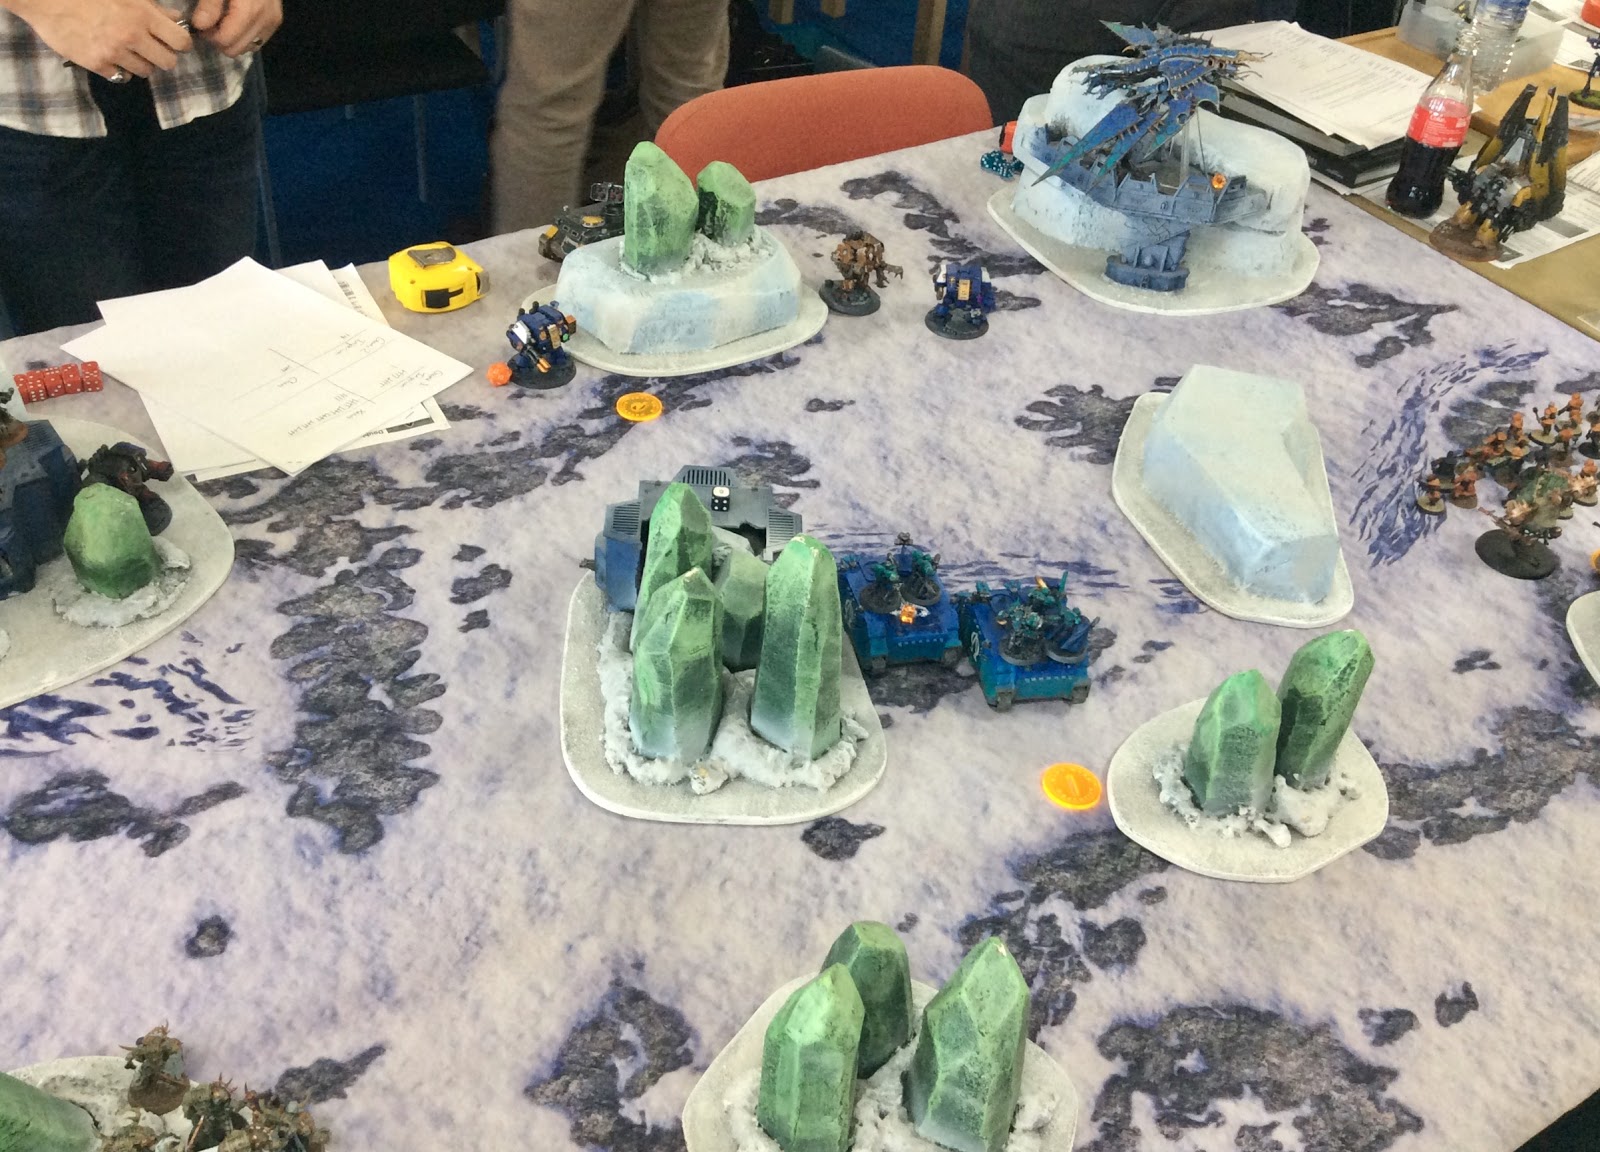
I felt like I was very much on the back foot, not helped by the fact that John won the roll off for first deployment, and then first turn. With most of his force on the centre line, apart from the Cultists on the objective, I felt the only option was to put almost all my force on the back line. I did brave the Skitarii units forward in elevated positions so the 'gallants' couldn't charge them, and if everything went really well they'd be forward enough to run for the objective from turn 2 onwards. I also spent a command point to give the Errant the Sanctuary relic for a 5+ invulnerable save in melee.


We started the game and predictably the Chaos forces moved deep into my deployment zone. Shooting from the Decimators killed off 3 of my Servitors, but there were no charges to be made so I got passed the first turn relatively unscathed.


The Knights moved into position as the guns of Ryza warmed up. Elsewhere the Ruststalkers, on the field for the first time, took the glorius duty of standing 2 inches away from the 'Gallant' on the flank to block it's movement. (They are behind the building.) A volley of fire from the Taranis lance forced the Acheron to rotate it's Ion shields, but did not do much significant damage. I dropped 4 command points into the Ad Mech to use Binharic Override, Eliminaton Volley and Plasma Specialists. The Servitors blasted the renegade 'Gallant', reducing it down to 6 wounds, while the robots plinked off some more wounds from the Acheron with a very strong set of wound rolls. The Errant declared a charge on the 'Gallant', but rolled disastrously and failed. Both Armigers went in to the Acheron, the first one in taking 6 wounds from the overwatch of it's enormous flamer. In melee they managed to put enough wounds on it to drop it to the middle damage bracket. In this turn I had severely wounded two of the three big Knights but I had hoped to kill at least one of them. I knew I was in for a tough time if I didn't get a strong turn 1.


The Chaos walkers swarm in around the brave Martians. In the shooting phase both Armigers fell to a combination of the Acheron's flamer (which rolled poorly) and the mortal wounds from the Decimators. The charge phase came about and John realised he had done a very silly thing - those Decimators had Siege claws on the models, but he had payed for Storm lasers instead (which he had not been shooting). I offered for him to revert to the list that he had set up the models for, but that meant removing the cultists and his ability to actually hold his own objective, so he declined. Instead he had a bunch of shooting units blocking the charge from his melee ones.


In the end only the badly damaged 'Gallant' was able and willing the charge in. The Sanctuary relic and the Taranis 6+ save did wonderful things and the Errant remained on it's full profile, and fought back to destroy the foul renegade! With that stroke of luck it was time to take the fight back to the Chaos filth!


My turn 2. The Errant moved in to the enemy Lords of War, while the Ruststalkers started advancing up the flank. Between the Thermal Cannon and the Plasma Servitors the Acheron fell. The Errant then charged the remaining Knight, damaging it enough to reduce it down to a lower damage bracket, which probably saved him from destruction in response.


John's turn involved the main force moving on my Ad Mech, while the 'Gallant' stepped back to allow the Soul Burners to fire in on the Errant. I played the Benevolence of the Omnissiah stratagem to give the Errant a 5+ save against the mortal wounds, and got really lucky, saving most of them. The renegade Knight was forced to charge back in to finally finish the job, but took damage from overwatch and as the Errant exploded! 


With only 3 wounds left on the last Knight standing, the Vanguard stepped up, used the Protector Doctrina Imperative and blasted it to bits. The Ruststalkers continued to advance to the Cultists and their objective.


Though all the Knights and one of the Decimators had fallen, John's Chaos forces were still pressuring my objective. Over the next couple of turns my two Tech Priests and remaining servitors fell, leaving my Skitarii making a mad dash back to help the immobile Robots clear them off.


At the end of my turn 4 the Sicarians were finally in range to charge the Cultists, which John had forgotten to move back. A big 11 inch charge got the Ruststalkers swinging in...


But their Transonic razors were not enough to clear all the Cultists, John's only Troop unit, off the objective...


And with a Decimator and a Daemon Prince controlling my objective, that signaled the end of the game.

I think I was definitely up against it in that game, John's list was much nastier than mine, and him getting first turn really gave me a tricky job to kill enough of his stuff before it came crashing into my castle on the objective. I think my forced fought hard and valiantly, and the Omnissiah was definitely watching over some of those dice rolls! I did however make an error in not putting my Kastellans on the objective - the whole point of having a set of fists in the unit was as a combat deterrent once they had become locked in place with the Protector protocols, but since they weren't actually on the objective John was able to just stand next to them and not charge at all. There is a good chance the Prince would have just killed them all anyway, but I could have gotten lucky (again) and it might have been enough to hold off for a turn so the Ruststalkers could kill all the cultists and force at least a draw for me.

Anyway, it was another fun game and another example of how surprisingly close the missions generated by the Open War deck can be.

Saturday 15 September 2018

Hive Fleet Goliath prepare for Winter(s)

Hello!

My Tyranids have been swarming up and preparing for a long journey through the void to a distant world, known as Swindon.


Soon, I shall take a 150 power level force for a narrative game against the incomparable Winters SEO. For those who don't know, Winters has been making wonderful, narrative focused video battle reports on his Youtube channel for many years, and is also (along with Liam from Moarhammer) behind Deployment Zone, which is a subscription service for yet more battle reports. I'm quite excited!


Since we will be playing a narrative game, I've put together a bit of a themed list, built around being in the late stages of a Tyranid invasion, with a nice mix of units, some of which are very powerful (at power level 5, the Malanthrope is an absolute bargain in this system) while others are more of a 'fun' choice. (Oh look, it's a Haruspex!) I've also deliberately not taken advantage of the power level system by putting maximum upgrades on things, as I don't think that's in the spirit of narrative 40K - you'll note that my regular Termagants aren't rocking devourers for example. I'm not entirely sure what I'll be facing yet, but I think there will be Knights, so I feel entirely justified in bringing along the Scythed Hierodule. He is not a super competitive choice but he has been very much enjoying 8th edition so far and has racked up quite the kill count. I'll be running the Jormungandr adaptation (as usual), and the army will be made up of a brigade and a super heavy auxiliary detachment. Normally I'd put the warlord trait on the Malanthrope, but I think it's more narrative for it to go on the Tyrant, who along with his guard, the adaption and proximity to the Malanthrope, should prove tough to kill.

Hive Tyrant: Adaptive Biology; The Miasma Cannon; Catalyst; The Horror; monstrous rending claws; Adrenal glands
Broodlord: The Horror
Neurothrope: Psychic Scream
Malanthrope

30 Termagants: 30× fleshboarers
20 Genestealers: Swift and Deadly; scything talons; 4× acid maw
3 Tyranid Warriors: 2× deathspitter; venom cannon; 3× scything talons
3 Ripper Swarms
3 Ripper Swarms

3 Tyrant Guard: adrenal glands; 3× scything talons & rending claws
Haruspex
3 Zoanthropes: Catalyst

3 Raveners: 3× scything talons & rending claws; 3× deathspitter
10 Gargoyles
10 Gargoyles

Tyrannofex: acid spray
Mawloc: biostatic rattle; adrenal glands
Trygon: prehensile pincer tail; adrenal glands

Scythed Hierodule


With any luck the battle report will end up on Youtube before too long and I'll be sure to put the link here on the blog. I'm not quite sure what mission we will play or what the narrative will be, but I am sure that there will be some large, line of sight blocking terrain, and many cups of tea!


Saturday 8 September 2018

Double Trouble 4 Game 3 - Chaos Marines and Renegade Knights vs Astra Militarum

Hello!

This is the third of three battle reports of my games at Double Trouble 4, a fun and random doubles tournament for 40K held at Element games, run by Alex of the From The Fang blog. You can find all the rules and details here, but the jist of it is that each player took an 875 point list and played three games with random opponents and a random partner each time. Points were scored separately for holding objectives at the end of a turn and for destroying enemy units. First report can be found here, second one here.

I took my Alpha Legion to the event, and my list can be found here. In short, I took a battalion featuring 2 Chaos Lords, 3 Squads of 5 Chaos Marines, 1 Blob of 30 Cultists, 2 Rhinos and a Heldrake.

Final game, and it's Chaos vs Imperium again, with a familiar foe on my side - Regular Opponent John and his fabulously dirty Renegade Knights. He took a rather brutal combination of two fist/chainsword Knights and an Armiger Warglaive. Not much board coverage for him, but very, very stompy - in fact John had already dealt out two tablings at this stage. This didn't look like it would be a push over though, up against us were Rob's Catachan Spearhead with Yarrick, Harker, 30 Cultists Conscripts, 3 Basilisks, a Wyvern and a Manticore. And as if that wasn't enough guns, his partner was Greg with a Supreme Command Astra Militarum detachment with a Commisar, 2 Psykers, a unit of Bullgryns and a Baneblade. I played Greg at DT3 in game 3 and that time the Bullgryns gave me a significant spot of bother.

Technically the game was supposed to be Rob and myself vs John and Greg, but in true Double Trouble spirit, we decided to switch around for the classic battle of Imperial vs Chaos, Guns vs Swords, brown/camo vs pretty colours.


Unsurprisingly we set up first and ended up getting first turn. That was 3 out of 3 first turns for me, which was very helpful. We moved up aggressively, having spent a command point to put the Cultists infiltrating up the board to try and take out the opposing not-cultists. I disembarked both the melta Marine squads and ran them out onto the two objectives on our side of the board. A very lucky long range shot from the Armiger hit and wounded the Manticore three times, but with a command point reroll we turned a 2 into a 1 for damage leaving it on 2 wounds. The Heldrake failed to finish it off, but it was now very poorly. One of the Knights charged the Bullgryns, who were standing next to Yarrick and a Psyker, and stomp stomp stomped on them killing off only one and a bit. 


Between Veterans of the Long War, Endless Cacophony and charging, the Cultists reduced the not-cultists to about 10 models, and as a result managed to just about claim the objective they were standing on. This gave us 4 objectives on the first turn - a good effort, though we had yet to actually kill anything and we were about to be hit with all of the Guard's firepower.

My forces were largely ignored as the big guns focused on the Knight on the left. Artillery fire (aside from the Wyvern) and the Baneblade went into it, splitting off the heavy bolters to kill off the Cultists. Good shooting from the Basilisks was met with Rotated Ion Shields and some good saving throws from John. I think he had used all his bad luck on our game earlier in the week. The Knight just about dropped to half. In the charge phase the Baneblade looked to run over the Armiger and reduced it down to about 3 wounds, but crucially leaving the super heavy tank locked in combat and unable to overwatch. I understand Greg had tried this manoeuvre with more success earlier in the day.


In our turn 2 we continued to hold objectives. My plasma toting Marines and Lords jumped out to assist the top Knight against those troublesome Bullgryns. The damaged Knight went around the back to charge the Baneblade, leaving the Armiger in to keep it from shooting back. I spotted a golden opportunity with the Heldrake who had been having quite a successful day up until this point. We popped Daemonforge on him to ensure the Baleflamer could finish off the Manticore...


...before charging the heroic Heldrake into the Wyvern and two Basilisks, along with Harker. Harker survived with one wound, but that was one artillery piece destroyed and 3 unable to shoot next turn, which was absolutely massive. And speaking of massive, the Knight on the left charged into the Baneblade, using the Renegade Knight re-roll stratagem to get all hits and wounds with the Reaper chainsword, cleaving the steel behemoth in half! Elsewhere the other Knight charged in, killing the Psyker that was buffing the Bullgryns, as well as killing more of them.

This was a hugely decisive turn, where everything went right for us, and did not leave the Astra Militarum many options to respond. Rob shuffled his artillery to break them out of combat and fired the remaining basilisk, and that was pretty much it.


With the Bullgryns finally falling, the Knights marched on the Catachan artillery, while the Drake continued to harass and distract them. My two Lords charged in to finish off Yarrick, while the Drake ate a Commisar and eventually Harker. In the middle turns Rob and Greg resorted to firing the remaining guns at selective targets to try and reduce both Knights to half and score some blood points.


They eventually succeeded in bringing both Knights below half, along with the Drake (mainly through overwatch) but in turn 5 and 6 the game was really over and it was just about us maximizing points. At the end of turn 6 the Guard were removed from the table.

This was a crushing victory for the Chaos forces. 1750 Blood Points to 731 and 25 Objective points to 5. The game swung massively in our favour on turn 2 when the Heldrake shut down nearly all of Rob's shooting while the Knight killed off Greg's Baneblade, and they simply did not have enough resources left to recover. I have no doubt that in slightly different circumstances Greg and Rob may have blasted us off the board before we ever reached their lines, but getting first turn and having some strong dice early one definitely gave us the edge. Having said that I think John and I pretty much made all the correct moves in that game, and our two lists complimented each other nicely. Being the 'support' to a destructive list like John's was basically the original intention of this list, so it was nice to see it working as it's supposed to.

And with that, it was time for the results. I won't go into great detail about who won what and placed where - because you can find all that on Alex's From the Fang blog here. Unsurprisingly, with 3 tablings to his name, John picked up the Genocidal Maniac award. The Master Tactician award was much more hotly contested. I came in 3rd with a combined 59 points, only a point behind second place and a mere two points behind first! I'm pretty happy with that! In other news John also won the conversion competition...


It seems that a good day was had by all. Especially my Heldrake, who was an absolute hero and definitely my MVP. I think he deserves some kind of name (though I'm not really sure what kind of name a Heldrake would have? Suggestions below please!) The Cultists also did their job, successfully causing problems then being conveniently dead by turn 2, and the rest of the army performed admirably, if not spectacularly as well.


Sadly, as mentioned elsewhere, this was the last event run by Alex, but there is hope that someone else will pick up the torch and run more Double Trouble events in future. Whoever that is, I wish them the best of luck, as I think we will all have very high expectations for DT5!

Thursday 6 September 2018

Double Trouble 4 Game 2 - Chaos Marines and Death Guard vs Space Marines

Hello!

This is the second of three battle reports of my games at Double Trouble 4, a fun and random doubles tournament for 40K held at Element games, run by Alex of the From The Fang blog. You can find all the rules and details here, but the jist of it is that each player took an 875 point list and played three games with random opponents and a random partner each time. Points were scored separately for holding objectives at the end of a turn and for destroying enemy units. First report can be found here.

I took my Alpha Legion to the event, and my list can be found here. In short, I took a battalion featuring 2 Chaos Lords, 3 Squads of 5 Chaos Marines, 1 Blob of 30 Cultists, 2 Rhinos and a Heldrake.

In game two I had the good fortune of a narrative appropriate match up. My Alpha Legion partnered with Jonathon's Death Guard patrol, containing a Daemon Prince, a Malignant Plaguecaster, a Plague Marine squad, a big Cultist blob and two Bloat Drones. We had a big Chaos hug to celebrate our joint hatred of the false emperor. With almost 60 cultists between us plus plenty more objective secured I think we were pretty confident we could have the board control.

Our opponents were, appropriately, both playing Space Marines. David, who I played against in game 1 of DT3, brought a Spearhead of his Executioners (Crimson Fist rules) with Captain/Lieutenant combo, 2 Devastator squads, a Whirlwind and a Leviathan Dreadnought in a pod. By his side was Chris with an Ultramarines Vanguard full of Dreadnoughts. I think there were 2 regular ones, 1 Venerable, 1 Contemptor and a Chaplain Dreadnought to lead them. They had a lot of guns and some combat punch, as well as plenty of tough units, but aside from the Leviathan dropping in somewhere, they would be mainly fighting from their own deployment zone. With all those dreads I opted once again to spend a command point to juice up my power fist Lord with the Slaaneshi elixir.

During deployment we decided to overload one flank, with the Heldrake and the majority of the Death Guard on the right, while only the Plague Marines took the objective on the left. My Rhinos with Marines took the centre to push forward and claim ground/objectives. Our opponents set up the two devastator squads in the raised structures with objectives on the flanks and spread the dreads across the line. I used Forward Operatives once again to put Cultists in their faces and hopefully tie them up.

David and Chris won the roll for first turn, but this was all part of the plan as I proceeded to seize the initiative!


Turn one movement underway. We covered the objectives on our side of the board while the Cultists swarmed over their central one. The Heldrake decided one of the Devastator squads looked tasty/flammable and flew over to them, with the Nurgle force moving up slowly behind. Note the Contemptor hanging in the corner to the right of the Drake - at this stage the Daemon Prince called him out as a target, in 2 or 3 turns...


Cultists shot up two dreads, plinking off a few wounds, before charging in the tie them up. Sadly I forgot they were Ultramarines so they could just walk away and still shoot me. On the right the Drake dispatched the Devastators.


In return the loyalists dug their heels in and opened fire. The Alpha Legion cultists fell, largely due to a big roll from the Executioner's Whirlwind, while the Death Guard ones lost a few of their number. The Heldrake became a huge target, taking fire from many dreadnoughts. A Flak missile from the remaining Devastator squad, combined with the Armorium Cherub, hit for a whopping 6 mortal wounds, but when all the smoke cleared the Drake remained on 2 wounds. The heroic Captain and Lieutenant revved their chainswords and charged in, surviving the overwatch and dealing a single wound! Shades of the first game for the mighty Heldrake!


In our turn 2 we moved out further. I dropped my plasma squad onto our central objective, while the Plaguecaster hung back on the right flank. Over on the left the Plague Marines moved up slightly to get some shots at the Devastators. My melta toting marines got out to try and finish off the two damaged dreads, while the Drake and one of the Bloat Drones flew down to assist. Lots of fire and bile covered one of the armoured veterans, causing him to explode! Luckily the Drake only suffered one wound, knocking off the one he regenerated at the start of the turn. The Marines then charged the shooty dreadnought to tie it up (surrounding it this time!) and claim the objective.

It looked like we were all over the loyalists, but in their turn 2 a big scary Leviathan Dreadnought podded down into our deployment zone. We quickly decided to ignore it and run away, allowing it free reign to start clearing us off the back objectives. More firepower reduced the remaining Cultists and eventually brought the mighty Heldrake out of the sky, causing it to explode and put wounds on both Bloat Drones, but fail to kill the wounded Captain. My Marines finished off the surrounded Dreadnought in melee for minimal loses.


Rhinos shuffled, Lords got out, Drones flew up to face the characters. Not much luck with out remaining shooting, but a lot of charges happened. My remaining Marines got in to the Venerable dread armed with missiles and plasma to force him to hit at -2 next turn. My other squad surrounded the Whirlwind and spent the rest of the game chipping away at it. The two Lords charged the Chaplain Dread, while the Prince charged the Contemptor and the Bloat Drones went in on the Captain and his Lieutenant. Lots of saves came out on all sides, the Chaplain activating the Armour Indomitus relic to survive my fist Lord, before crushing him in return. Both Marine characters survived against the Drones, while the Contemptor and the Prince tore big chunks out of each other.


Over the last few turns we continued to score objectives while the Leviathan continued to clear out half of the board. My Marines took out the Devastators and held their objective while the Bloat Drones finally removed the characters, allowing the few remaining cultists to take their place. I think the Chaplain Dreadnought eventually fell, as did the Contemptor. I think it exploded and killed the Prince? Either that or the Prince died and killed it with mortal wounds from the suppurating plate. My Marines finally destroyed the Whirlwind, causing it to explode and leave only the champion, who decided he had done his job and fled the field. The end was a bit of a blur to get turn 5 in the time limit, but I remember lots of stuff exploded.

In the end the blood points were incredibly close - the snow now covered in loyalist and traitor blood alike. Jonathon and I picked up 1182 but David and Chris just pipped us with 1189. However our board presence paid off in a big way on the objective points, with the forces of Chaos trouncing the followers of the corpse god 21-8. Another fun and successful game for the Alpha Legion. Once again the Cultists and Heldrake gave us some invaluable early disruption while the Rhinos and Marines were able to cover the objectives all the way through the game - just as planned!

Tuesday 4 September 2018

Double Trouble 4 Game 1 - Chaos Marines and Custodes vs Imperial Knights and Space Wolves

Hello!

This is the first of three battle reports of my games at Double Trouble 4, a fun and random doubles tournament for 40K held at Element games, run by Alex of the From The Fang blog. You can find all the rules and details here, but the jist of it is that each player took an 875 point list and played three games with random opponents and a random partner each time. Points were scored separately for holding objectives at the end of a turn and for destroying enemy units.

I took my Alpha Legion to the event, and my list can be found here. In short, I took a battalion featuring 2 Chaos Lords, 3 Squads of 5 Chaos Marines, 1 Blob of 30 Cultists, 2 Rhinos and a Heldrake.

In the first game I was teamed up with Callum and his Custodes supreme command detachment. He had 3 Shield Captains on jetbikes and 1 on foot, as well as 3 Allarus Terminators. (Apparently he wasn't sure if this was cheesy - I think we agreed that yes, it probably was.) Clearly my sneaky Alpha Legion had convinced them that they were totally loyalists, honest. On the other side of the board we faced Alex, the tournament organiser with his House Raven Knights - A Crusader and 2 Helverins. I absolutely appreciated the orange on these guys. Apparently the list was chosen not for the power of it's 3 models, but for the ease of simultaneously running a tournament while playing the game with them. Alongside the Knights were Matthew's Space Wolves, who were granted special allowance to use the new codex after the list submission deadline because Alex is a nice man, and his blog is literally called 'From The Fang'. I'm pretty sure I played either with or against Matthew in the first Double Trouble event when he was running Tau and I was running Ad Mech, so it was cool to clash once more/for the first time. His list included 3 Wolf Lords on Thunder Wolves, 5 Intercessors, 5 Grey Hunters, 5 Blood Claws, 5 Long Fangs and 5 Skyclaws.


We set up in the wedge shaped deployments for this one. Callum and I both spent command points to use bonus relics (taking the 'Slaaneshi Steroids' my warlord would now strike at strength 10 with his power fist), and I spent a command point to deploy the Cultists as Forward Operatives. The Terminators started in reserve, as did the Skyclaws. We won the roll off for first turn and we were off!


Our forces moved up the board to take objectives and cause problems. (Apart from the walking Shield Captain who stood behind a building on an objective for the entire game.) The Cultists managed to kill off 4 marines or so and then tie up two squads and 3 wolf lords, keeping them penned in for the first turn. On the other flank the Heldrake totally fluffed breathing on the Intercessors, via me rolling a 1 for the number of shots for the Baleflamer, after a command reroll! More importantly, the drake successfully charged one of the Helverins, keeping it from shooting next turn. 


After Alex and Matthew's first turn they were still mostly stuck in their deployment zone. They popped one of my Rhinos and obviously finished off the cultists, but failed to drag the drake out of the sky. The Helverin that could shoot blasted it for 4 wounds, each doing 3 damage, and I only passed one save after a command point was used, but after that it passed everything and stubbornly stayed up with 3 wounds left.


Our turn 2 and the Jetbikes moved up for charges. My Rhino deposited a squad to sit on the objective, before driving up with the Warlord on board and popping the smoke launchers. My other two squads spread out to cover the middle objectives. I debated leaving the Heldrake in combat with the Helverin and Intercessors to keep the tied up or jumping up to set fire to the Long Fangs. In hindsight the smarter move would have been to stay still, but I wanted to burn stuff so the drake jumped up and promptly got 1 or 2 shots with the Baleflamer for no damage. In other news, we forgot to bring the Terminators on. Not a very killy turn, but we did hold most of the objectives. 


The Skyclaws were not forgotten however, coming on in our rear to threaten an objective and the squad that was sitting on it - until the Crusader fired on them with the rapid fire battlecannon. Elsewhere the Helverins took out the Heldrake and all three Wolf Lords got into combat, eating one of my remaining squads and largely bouncing off Custodes invulnerable saves. The Intercessors also managed a charge onto one of my remaining units to take an objective from them.


Turn 3, and the Terminators finally arrived (Callum had placed the models in highly visible spots around the board so as not to miss them again), and started chopping their way through the Armigers on the flanks. The Shield Captains killed off the Intercessors and a Wolf Lord, while my warlord punched another one in the face with a power fist. The third Shield Captain on bike charged the Long Fangs but had a bit of a whiff. I didn't have much left on the board, but I spread out and managed to hold 3 objectives at the end of our turn.

In response, the Skyclaws charged the Rhino to take the objective (but failed to kill it), while the remaining Grey Hunters sneaked onto another objective while staying 3 inches away from my Lords to avoid Heroic Intervention. The Knight blasted the Long Fang hunting Shield Captain off the board. With time rapidly running out, in the final act of the game, the Allarus Terminators felled the second Helverin.

In the end while it was very close on blood points (we scored 846 to their 796), Callum and I were comfortably ahead on the objectives (we came out with 13 to 8). It was a little disappointing to only get to the end of turn 3, but this was mainly because we were having a good time chatting and drinking tea (thanks Alex!), so it wasn't really a problem. My army mostly got blown off the table, but it did score us a lot of points for objectives (which was my intent from the beginning this time), and both the Lords survived, so clearly the losses were acceptable, plus many loyalists fell this day, which is nice.