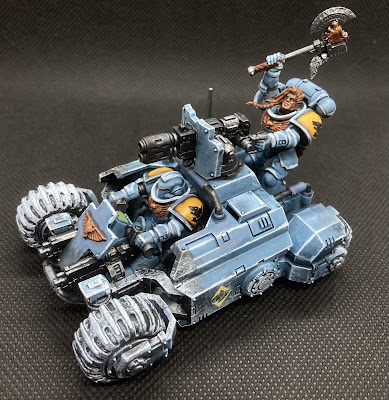
Seems that this lockdown and tier system has turned this blog into a bit of a Space Wolf one! I ran out of models to paint earlier in the year (though nearly Christmas, so fingers crossed...), and having not played any real games for a while (Tabletop Simulator scratches the itch a little, but it's not the same), it's just been 'commissions'. So here's some more:
Brrrrrmmm brrrrrmmmm, it's the biggest 'bikes' around, the Invader ATVs! Can't say I was initially a fan of these models, but as is often the case, getting my hands on them has warmed them to me a lot. They were also fairly fun to paint, aside from the areas inside the driver's compartment, with lots of big obvious lines to highlight and an excuse to drybrush a load of snow over the wheels and underside. Easy to build meant the guns are interchangeable without too much hassle (just removing the pegs on the handles) and when adding some wolfy bits I couldn't resist a 'drive my closer so I can hit them with my axe' guy. In the end I'm pleased with the result, and I feel thanks to the head swaps and snow weathering, they have quite a lot of character for what is otherwise a fairly generic kit.
While I was at it, I thought I'd do some WIP pics this time, so I could record my method for doing the armour - in case anyone is interested, and in case I ever have to do any more! Firstly they were sprayed with Army Painter's Wolf Grey primer.
Next step was a drybrush of the now confusingly named Wolf Grey from Vallejo Game Colour.
Then a blob of contrast - the easily differentiated Space Wolf Grey mixed 50:50 with Contrast Medium. It was applied liberally but with the larger pooled areas brush stroked away. This seemed the best way of getting the desired effect without looking too 'contrasty'. On some of the larger panels I then added a bit of a watered down blue wash on the lower half, to add a bit of gradient, though again careful not to let it pool.
Skipping ahead several steps until most of the detail is done, the last addition to the armour (other than weathering and tidying up) was to go back with Wolf Grey (the regular paint one, not the spray one!) for some selective edge highlights.
And that's that. Here's a bunch more completed pictures, I do hope you like them, and you all stay safe.


Great job, they have warmed a little, the lack of ground clearance, lack of frontal armour and the gun muzzle right by the drivers helm still puts me off.
ReplyDeleteLovely work! I'm all with you on wanting to get more games played. I've managed less than 10 this year, a real low value for me.
ReplyDelete